Quantcast
Channel: Kitchen Archives - Retro Renovation
Viewing all 371 articles
Browse latest View live

Georges Briard tiles — Tens of thousands of pieces of New Old Stock — 30+ designs — discovered

$
0
0

Georges-Briard-tiles

how-to-make-vintage-ornament-wreath

Thanks, Danielle, for this great tip — Danielle is a retro-loving friend I invited to my first-ever wreath-making session!

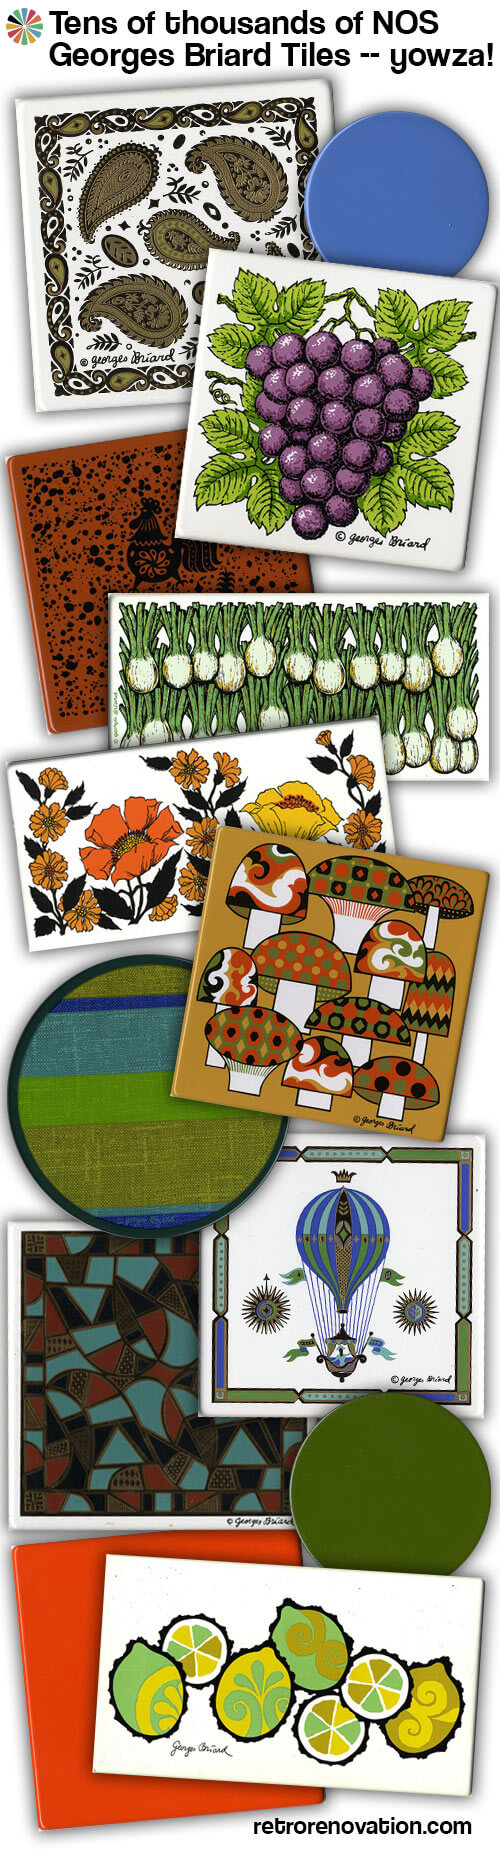
Here’s yet another story of a ginormous stockpile of New Old Stock discovered: Mark, who occasionally does estate clean outs, stumbled onto a stockpile of thousands — no, Tens of Thousands, he says — New Old Stock Georges Briard enamel-painted metal tiles. He wants to sell them, either as one batch for someone else to deal with, or, he will consider selling them as individuals (he already has some listed on ebay). He sent me 32 samples to take a look at — I scanned them — and so get ready for an eye-popping photo series! Mega thanks to my friend Danielle, who saw Mark selling these at Brimfield and told him to contact me stat — you know what we love, Danielle!

Photo viewing tip: On a desktop computer, you should be able to click on any image and it should enlarge up to 1,000 pixels wide so you can see more detail. Hit ESC to go back to the story. This functionality should work on most all our stories.

vintage georges-birard décorative tilevintage georges-birard décorative tileThe tiles arrived in a variety of sizes: Approximately 4.5″ x 4.5″ … 6″ x 6″ … 8″ x 8″ … 4″ x 8″ … there’s one that’s 7″ x 12″ … and as you will see, a trim piece and some round ones, large and small. Mark says there is an even larger size — he’s sending me a second batch of tile samples uncovered since the first mailing so I can do a follow up.

Pricing: Mark says pricing starts at $5 for a 4″ x 4″ square… but the cost will depend on style, size and number purchased. At Brimfield, folks liked the op-art tiles — the more modern ones. Of course, I like the colorful and kitschy ones best! If you are interested in buying some of the tiles, continue on: Mark’s contact info is at the bottom of this story.

vintage georges-birard décorative tilevintage georges-birard décorative tilevintage georges-birard décorative tile
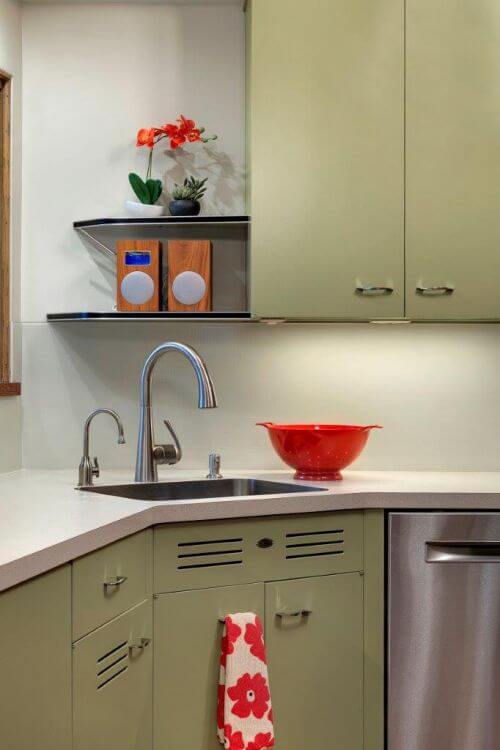
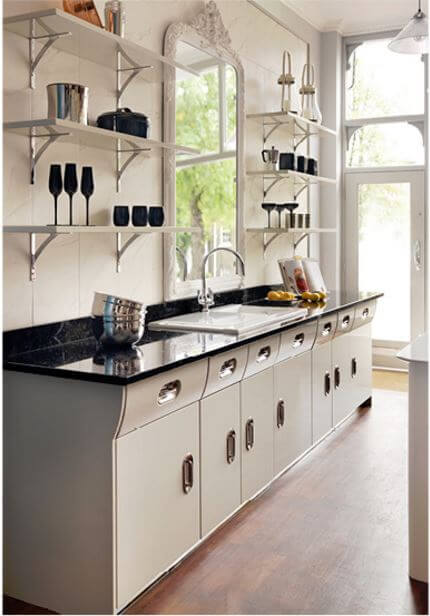
My sense is that these tiles were used as singles designed into items like cheese boards, trivets, tile trays and even pot lids. I was thinking I might use some for my kitchen backsplash…. Kate also suggested using them to make small tile-top tables for a patio. 

  • There are a lot of “finished” products using these tiles for sale on ebay. Take a look-see >>George Briard Tiles on ebay (affiliate link)

vintage georges-birard décorative tile vintage georges-birard décorative tile vintage georges-birard décorative tile vintage georges-birard décorative tileThe back story on this find: They were stored for many years by a man who must have purchased them close-out from the factory; the man was a hobbyist who likely had the intent to fashion them into products.

The tiles were in boxes from at least two companies: Erie Ceramic Arts Company of Erie, Pennsylvania, and  Veos Porcelain Enamel Products Corp. or Rehobeth, Mass. There could be more companies involved — these names were spotted on just two boxes in the stockpile now at Mark’s place.

It could be that all these boxes then came to a central manufacturing facility — possibly in eastern New York state, because that’s the area where Mark found them.

vintage georges-birard décorative tile vintage georges-birard décorative tile vintage georges-birard décorative tilePrecautionary Pam reminds: Vintage materials and products may contain hazards such as lead paint — consult with your own properly licensed professional to assess what you are dealing with/working with so you can make informed decisions how to handle. For more info and links see our Be Safe / Renovate Safe page here.

vintage georges-birard décorative tile vintage georges-birard décorative tile vintage georges-birard décorative tilevintage georges-birard décorative tile vintage georges-birard décorative tile vintage georges-birard décorative tile vintage georges-birard décorative tileThere is quite the diversity of designs! Mid mod… flower power… Victoriana… many solid colors … and my favorite of the moment: Avocado, orange and harvest gold mushrooms! I tend to think that given this diversity, a lot of these tiles were made in the 1970s. When were cheese boards popular? That said, Mark says that they found lots of newspaper wrapping dating to the 1960s.

georges-birard-mushroom-tile-grid3-largeTee hee. I had Kate make me a patterned “backsplash” using the mushrooms and coordinating orange, avocado and harvest gold solid-color tiles. Desktoppers, be SURE to click on this one to see it large! Ben Sander: I challenge you to do this for someone!

vintage georges-birard décorative tile
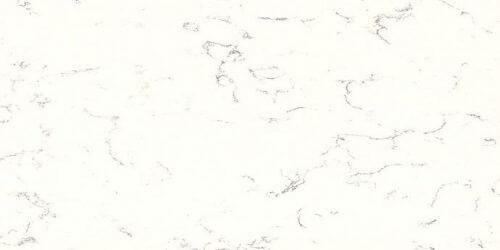
My scans are not necessarily color-correct. The colors in the actual tile above, for example, are much more vibrant. And there’s metallic paint. There is metallic paint on A LOT of the tiles. Ya gotta see the samples.

vintage georges-birard décorative tileThe one above is the 7″ x 12″. It’s pretty awesome. I could design an entire kitchen around this design, too.

vintage georges-birard décorative tile vintage georges-birard décorative tileAbove: A 4″ x 8″ subway. Hmmmmm…..

vintage georges-birard décorative tile
… To go with this happy pineapple. And I think there are more pineapple designs.

vintage georges-birard décorative tile vintage georges-birard décorative tile vintage georges-birard décorative tile vintage georges-birard décorative tile vintage georges-birard décorative tile
vintage georges-birard décorative tile vintage georges-birard décorative tile vintage georges-birard décorative tile

I kinda adore roosters and chickens in the kitchen.

vintage georges-birard décorative tile
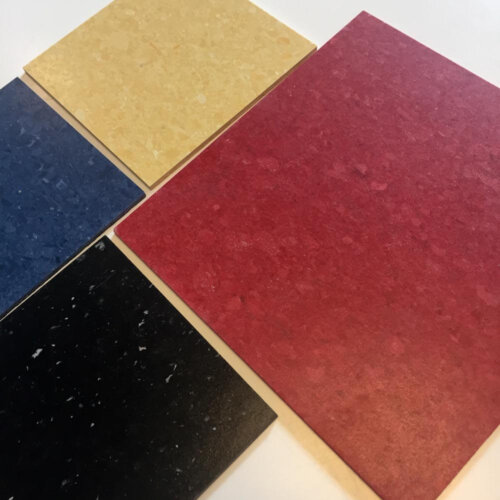
Seller Mark send me these photos before he sent me the samples. They provide an alternative ways to see some of the colors:

vintage decorative tiles vintage decorative tiles vintage decorative tiles vintage decorative tiles

Okay: So you want to buy some of these George Briard tiles — or all of them? Here’s how:

Are we having fun yet?

The post Georges Briard tiles — Tens of thousands of pieces of New Old Stock — 30+ designs — discovered appeared first on Retro Renovation.


Heidi & Scott recreate a 1950s birch wood kitchen for their Cinderella ranch house

$
0
0

20160424-SWANK_MG_3887Chatting it up with Nevada Preservation Executive Director Heidi Swank during my recent trip to speak at their second annual Las Vegas Home & History Tour, I was tantalized to hear about all the work that she and her husband Scott had been doing to revive their 1956 Cinderella ranch. In particular, there was a big, recently-completed kitchen renovation mentioned. So right after Heidi and I went shopping and before heading to the airport for my flight home, I asked her pretty please could she take me for a quick peek. Oh my goodness! Open the door from the garage into the kitchen — and it was 1956 — all sparkly new again! Photo above: ©2016 Kirsten Clarke Photography.

Photo viewing tip: On a desktop computer, you should be able to click on any image, and it should enlarge up to 1,000 pixels wide so you can see more detail. Hit ESC to go back to the story. This functionality should work on most all our stories.

before-kitchenAbove: Before. When Heidi and Scott bought the house in 2005, the kitchen was in rough shape, the victim of some poor quality remuddling in the late 1960s [dating tip: all that harvest gold]. Under the white paint on the cabinets was a dark layer of paint that had seeped into the wood… cabinets had been moved around into odd configurations … and, later, the couple even discovered a pocket door to the foyer that had been walled over.

mid-century-modern-kitchen-6-2Above: After. The Great Recession — along with another project, renovating a rental house — slowed down Heidi and Scott’s ability to begin renovating the kitchen until about two years ago. By then, they knew just what they were going to do, and had the resources to do it. Their goal: to rebuild the kitchen as close to the original 1956 version as possible, with just a few, mostly invisible, ‘upgrades’. I think they did a swell job, don’t you! This kitchen is functional, friendly, suits the home’s original architecture — and Heidi says it was all done pretty affordably, too.

mid-century-modern-kitchen-1Above: That’s the door that had been walled over. The dinette bench was designed to include storage; originally, there was a planter in that spot. The light is vintage — “simple” — Heidi searched long and hard for a light that wouldn’t compete with the starbursts on the wall.

mid-century-modern-kitchen-13All the cabinetry is new — but built to look just like the originals, both in design and stain color. Their cabinet maker is Trent Nielsen of Integrity Cabinets and Woodwork in Las Vegas (no website, but google for the phone number, etc.) Heidi said that getting all these birch cabinets — yes, the entire kitchen — was accomplished very affordably.

Above: The glass-fronted cabinets in the dinette area and to the right of the doorway to the living room are pretty much an exact replica of the cabinetry that had originally been there. When they bought the house, the countertop was tiled, but Heidi says that during demo, it appeared that birch countertops were originally constructed there. Nice!

mid-century-modern-kitchen-14Above: One the other side of the doorway, the original cabinets were built all the way to the ceiling, kind of like pantry cabinets (see the before shot, above). For symmetry (and because there already was plenty of storage in the kitchen) Heidi and Scott downsized this configuration in their remodel.

mid-century-modern-kitchen-10The rest of the kitchen layout is pretty much like the original.

Above: The refrigerator always was in this spot. But this gorgeous vintage machine is new to the house. Heidi & Scott bought the light blue GE refrigerator from Tampa via craigslist “for a song,” so the shipping cost wasn’t a job-stopper.

heidi swank in her midcentury kitchen

I asked Heidi about this vintage refrigerator’s energy usage, a topic that has come up now and then on the blog. She said that they saw no difference vs. the newer model they had before. Peoples: I have read that it’s the automatic defrosting — that is, running a second generator that literally heats up the freezer compartment to melt frost build-up — that takes lots of energy in older refrigerators. These very-oldies don’t have auto defrost — hence, may not be energy hogs, relatively speaking. Heidi says defrosting is easy peasy. Every couple of months, they just put perishables in a cooler, towels in the fridge, pull the plug and go see a movie. When they come back two hours later, the freezer frost is gone.

recessed toasterThe Swanson recessed toaster was original to the house.

mid-century-modern-kitchen-1-2Heidi said that when they first bought the house 10 years ago, she and Scott went a little crazy buying all kinds of New Old Stock and salvage items — lots of fantastic lighting, especially — on ebay that they could eventually put into the house (and their subsequent rental properties). I think their timing was spectacular: Circa 2005 and 2006, mid mod was not in the kind of revival (frenzy, even) that it is in today, and you could find stuff CHEAP. I bought a lot of great stuff inexpensively then, too. Oh, the good old days.

mid-century-modern-kitchen-3Above: Escutcheons and Amerock atomic cabinet pulls are all New Old Stock purchased during that period. Eat yer hearts out.

Nutone mania:

mid-century-modern-kitchen-9 All the Nutone goodies were original to the house. Heidi and Scott added the kitchen island to the kitchen design and installed the Nutone Built-In Blender system. They didn’t have all the accessories, but easily acquired them via ebay, etc. Heidi says the unit works great.

mid-century-modern-kitchen-12The innards for this Nutone atomic clock were in place, but the clock was gone. Heidi and Scott replaced the whole thing with NOS. This is a wonderful Nutone clock. I have a NOS face for one… they are around… they come up.

mid-century-modern-kitchen-6Heidi believes the Thermador cooktop was added in the 1960s. She loves it, and told me that Thermador still provides service for this cooktop! A burner went out… they called Thermador … and Thermador came out and fixed it. Woah! We don’t hear many stories like that any more. Note also: the Nutone exhaust hood.

mid-century-modern-kitchen-2-2

Above: Detail of delicious coppertone-y Nutone hood.

Other kitchen details:

mid-century-modern-kitchen-11Above: Countertop: Formica Gray Ellipse from their 100th anniversary collection. This pattern is now discontinued, but Formica says. “You can check for any remaining availability by contacting Formica Corporation at 1-800-FORMICA™ (367-6422).”

mid-century-modern-kitchen-15

Above: Ceiling lights: Ikea Calypsos — $29.99 each.

mid-century-modern-kitchen-4-2Above: Some of Heidi’s collections: Moo cow creamer set, and Rosenthal pattern designed by Raymond Loewy in the 1950s that she and Scott have just started collecting. She said the pattern does not have a name, just a number.

mid-century-modern-kitchen-10-2Above: Vinyl starburst decals purchased from wordybirdstudios on etsy.

mid-century-modern-kitchen-3-2Above: Scott brought these aluminum cannisters with him to the marriage. The black flourish reminds me of the cabinet pulls — nice tie in!

mid-century-modern-kitchen-2Above: The Nutone wall oven: “We drove to LA and back in a day to pick it up, it came out of an eichler.  We keep our appliance guy busy.” Heidi is a big proponent on getting the wiring checked out on all old appliances — I am, too: Be Safe / Renovate Safe!  

Flooring is Armstrong VCT tiles.

The “upgrades”? Note the wine fridge … many of the cabinets now contain pull-out shelves … and how about that little 18″ Bosch dishwasher. “We wanted to make the house we want,” Heidi said, “but we also wanted to be thoughtful about it so that the next owners wouldn’t have to make massive changes.”

“I love that kitchen,” she told me. Yup: We do, too!

20160424-SWANK_MG_3903Thanks, Heidi and Scott, for generously sharing this inspirational space with all of us! Photo ©2016 Kirsten Clarke Photography.

The post Heidi & Scott recreate a 1950s birch wood kitchen for their Cinderella ranch house appeared first on Retro Renovation.

What’s new at Kate’s retro ranch — Cork flooring!

$
0
0

midcentury bedroomMy husband Jim and I have lived in our 1962 ranch house for six years now. The previous owners had readied the house for sale by painting every wall greige and installing new light beige carpeting in all three of the bedrooms and the hallway, which I suppose created a blank canvas for potential buyers to start with. Right away we started painting all of the walls different colors, but since the carpet was brand new, we didn’t feel like it was a priority to replace it right away, so we lived with it. Our beloved dog Leo is not easy on carpeting, so after this amount of time, there were many dog related dirt stains and wear paths on the wall to wall carpet — especially in the hallway and at the foot of our bed, where he sleeps each night. Jim and I decided it was time to replace the carpet — so we took a cue from 1962 and looked into cork. 

Why cork?

The goal for any remodeling and decor project in my 1962 ranch house is always to choose as period appropriate materials as the budget and availability will allow. Cork was a popular flooring choice in midcentury America, and one that was definitely used in our retro ranch — a few examples still were in place.

Besides being period appropriate for the era of our house, cork is a fantastic option because of its durability and ease of care, and because it is easy — somewhat resilient — and warm to walk on. It is really quite comfortable. You can read more about the benefits of cork, specifically the brand we purchased here.

How I choose my brand/style of cork

Cork flooringIn the photo above, you can see the original cork flooring that is in the closets in each bedroom (top). The cork in the closets were still in like-new shape, so we left it as is. We really liked the look of the original cork, so we searched for a cork flooring option that would be as similar as possible to it. Wicanders CorkComfort Originals Rhapsody (0225002) vinyl backed cork flooring was the closest we could find in pattern and coloring.

Cork flooringThe second reason we chose Wicanders was because I liked the fact it came with a protective pre-finished coating, which seemed to help it perform well in the quality test I came up with. In my test, which I used on a variety of brands of samples we had collected, I scratched the edge of a quarter across the sample with some pressure and after about 10 minutes, checked to see if the cork had “bounced back.” On the Wicanders, I could not tell where I had performed the quarter test at all. This is important for someone who lives with a large dog like Leo, whose nails have scratched our hardwood floors. And so far, he’s been unable to inflict any damage to the Wicanders cork! It could be that the Wicanders performed well because it has a protective pre-finished coating on it. This also means that I didn’t have to apply any sealer, and the flooring will not need to be periodically waxed or coated with anything to maintain it. Just vacuuming and damp mopping once in a while is all that is needed — much easier to clean up that doggy dirt! Note: It could well be that other brands that require you apply your own sealer after installation would do just as well on my quality test — do your own research on this — there are a lot of options to weigh!

We also notice that the cork hides dirt quite well, so even if the floor is in need of a cleaning, it doesn’t look bad at all.

Cork flooringWicanders flooring is available in both glue-down and snap-together plank flooring options, but this particular style — CorkComfort Originals Rhapsody — was only available in 12″ x 23.75″ glue down tiles. While that type of installation is more challenging than snap-together planks, we were okay with it because the thinner, glue down tiles would line up evenly with our other flooring, allowing for smoother transitions between our tile bathroom floors and wood flooring in the rest of the house.

Be tenacious — but be nice, too — to avert a crisis!

Once we decided to go with the Wicanders flooring, ordering it was a challenge. It took calls to several different local flooring showrooms before we found one that could make the order for us and even then they noted that the particular style we wanted had been discontinued! Ack! I explained that I had my heart set on this particular style and the flooring representative was luckily able to find the eight boxes of flooring we needed for our project and have it shipped to their store for pick up. Crisis averted! One bonus to us picking a discontinued style: We got a nice discount on the price per square foot!

The results

Cork flooring Cork flooringSince I am well versed in DIY and the flooring itself was not inexpensive, I decided to install it myself. I started in our office first. It was quite a job and took several days, but the end results are fantastic! Of course, I followed all the installation instructions carefully and used all the safety and ventilation equipment and guidance recommended — do your homework on this — Be Safe / Renovate Safe!

Cork flooring Cork flooringNext came our bedroom. By this time I had the installation process figured out, so the hardest part was moving all of the furniture around. Broyhill Brasilia is not lightweight stuff! Once the flooring was down, Jim and I thought about getting a small area rug to go under the bed for further warmth underfoot, especially in the winter. But, we found that the cork really doesn’t get that cold, even during January in Wisconsin. On bare feet it feels much warmer than our hardwood floor in the main part of the house. We just love it!

Cork flooringThe third bedroom got the royal cork treatment… and then…

Cork flooring

…We wrapped up the job in the hallway. Another reason we picked this particular cork — look how well the color matches the hardwood flooring and the original oak trim. Keeping the flooring in the same color family makes the whole house blend together and avoids a choppy feeling.

Cork flooringCork flooringI also love how the cork looks next to our tile bathroom floors.

Cork flooringOnce the floor was installed, it blends together and looks like one big piece of cork — the individual tiles can only be discerned at certain angles with the light hitting them just right. I think that is part of what helps our hallway look bigger than it did before.

We’ve been living with our new cork flooring for about six months now, and we are still in love with it. It fits our lifestyle well, is easy to clean and maintain and fits the era of our house perfectly. It was not an inexpensive project — even with our discount and my doing the installation — but we think that with proper care, it should last a lifetime, whereas if we had recarpeted, our dog would have destroyed it in another 5-8 years, necessitating another major flooring project.

The verdict: If I had it all to do again, I’d pick cork every time.

Link Love:

  • During my researching phase, I found this story on fellow retro loving couple Rita and Cane’s blog This Sorta Old Life to be very helpful. Lots of good information there! Of course, when undertaking projects like this, do your own research and consult with your own pros.

The post What’s new at Kate’s retro ranch — Cork flooring! appeared first on Retro Renovation.

Magnetic paper towel holder for your steel kitchen cabinets from Harbor Freight Tools

$
0
0

magnetic paper towel holderAnother of the joys of vintage steel kitchen cabinets is that they hold magnets. Reader Tommy emailed me just yesterday with what looks like a good (great?) source for some accessories that you can affix in a magnetic minute. Tommy wrote:

If you have a Harbor Freight Tools store near you, check out their magnetic paper towel holder that they sell for use on mechanics tool boxes. they are perfect for use in metal kitchens. They also have some other magnetic accessories that can come in handy. Bought some for my shop, and had to go back and get some for the house.

magnetic-holderAbove: This tray is kinda interesting, too. I can think of a place I could use it:  On the inside of the wall cabinet where I keep my vitamins and other medications that I take when I eat. The bottles always get smushed sitting in the cabinet. It could be nice to just swing out the door and there they would be. The candy apple red is even perfect for my kitchen. But I am sure you could shoot these with a high quality spray paint meant for metal to coordinate with your cabinets or accent color.

There is a Harbor Freight Tools in the town next to mine, so I’m gonna go take a look. Ooooooh: Going through every aisle of a hardware store! From my very earliest days as a kid, my favorite was going to the hardware store and looking at everything — how about you?!

Thank you, Tommy, for this great tip!

The post Magnetic paper towel holder for your steel kitchen cabinets from Harbor Freight Tools appeared first on Retro Renovation.

One ingenious couple + two sets of vintage St. Charles kitchen cabinets = a gorgeous midcentury modern kitchen remodel

$
0
0

midcentury modern kitchenroger-and-lyndseyOne of the most enjoyable parts of our trip to KBIS 2016 in January was meeting some of our readers there — like Roger. When we met, he mentioned he had recently remodeled his 1953 kitchen featuring St. Charles steel kitchen cabinets. We followed up — and oh my! — hold onto your hats, we’ve got one epic look at Roger and his wife Lynsey’s kitchen renovation. “After” photo above courtesy of Che Bella Interiors and Spacecrafting.

After Roger and Lynsey sent me photos of their home and kitchen renovation, I had lots of questions, which they were happy to answer:

Q. When you bought the house, were you looking for a home with midcentury features?

Yes. Lynsey had been interested in mid-century modern design for a while—and after we started looking at MCM homes in the Twin Cities, Roger started falling for the style as well (although he had always been interested in Frank Lloyd Wright’s work). Because we were open to living nearly anywhere in the Twin Cities (both of us worked from home at the time), we waited for the “right” MCM home to come along.

midcentury living room

Q. What made you decide your house was the one?

Insanity?! There was really no good reason to buy the house upon inspection—absolutely everything needed upgrading, from the leaking roof and crumbling 500-foot long driveway, to the out-of-compliance septic system and electric. The house had been on the market for more than a year and a half, but hadn’t been occupied in more than five years. So it was in very rough shape when we first looked at it (cobwebs everywhere, a dead mouse in the water softener, water damage, and years of dust and grime).

midcentury living room

The handsome dog is Mario — he has two brothers that are not photo bombers. They are miniature schnauzers named Newman and Kozmo.

At the same time, we thought it was cool. The home had everything we were looking for—MCM style, lots of land (10+ acres), privacy (yet still in the middle of a major suburb), and a lake! We were attracted to the home for its “prairie modern” feel—MCM meets Frank Lloyd Wright. (In fact, many of the homes in the surrounding neighborhood were designed by John Howe, who was Wright’s principal draftsman.) Additionally, the striking living room fireplace (plus one in the kitchen and another in the den), abundance of windows, unusual layout with interesting angles, St. Charles cabinets, and original light fixtures were all draws.

We actually found the home when it was shared by the listing agent on our local MCM Facebook group. Lynsey saw the listing and kept an eye on it—and when the price dropped significantly, we made our move. The buying process was long and drawn out, given negotiations around a new septic system (required before closing) and other required repairs. We closed in November 2014 and had a few months to begin work on improvements before selling our old house and moving in at the end of January 2015.

vintage St. Charles steel kitchen cabinets

Q. Did you know right away that you wanted to keep the original St. Charles cabinets?

vintage St. Charles steel kitchen cabinetsYes! In our quest for an MCM home, we became familiar with St. Charles cabinets through Retro Renovation. So, during our first viewing when we saw that this home had St. Charles cabinets, we were sold. We knew that we would be able (someday) to restore them to their original glory. (We had no plans, however, to start a major kitchen remodel. Funny how that worked out!)

vintage St. Charles steel kitchen cabinets vintage St. Charles steel kitchen cabinetsvintage St. Charles steel kitchen cabinets

Q. Tell us about the cabinet repainting process, as well as buying the extra blue cabinets to fill in your set.

As part of our home’s purchase, we wrapped some of the major improvements into our loan—the new driveway, roof, electrical upgrades, and appliances. Given the structure of our loan, we were on a deadline to get new appliances, but couldn’t find a wall oven small enough to fit into the existing St. Charles cabinet 24” opening. (The original oven worked, but it was just. so. small.) So, we decided that we would fabricate an “oven box”—basically a framed and dry walled box to house a 27” wall oven. On a late Saturday afternoon we removed the tall St. Charles cabinet with the original wall oven and warming drawer so we could start figuring out how to frame this “box.”

vintage St. Charles steel kitchen cabinetsvintage St. Charles steel kitchen cabinets

However, after the tall cabinet was removed, we found ourselves liking the open feel of the kitchen—and started thinking about a more traditional range/oven combination rather than a wall oven and drop-in range top. We couldn’t figure out a way to rearrange the existing cabinets to make the appliances work, so early the next morning Roger hit Craigslist. By the time Lynsey got out of bed, Roger had found an entire kitchen of blue St. Charles cabinets in Omaha, Neb., that had just been listed! We secured the measurements, spent an entire day calculating and drawing, and determined (essentially on the back of a napkin) that we could blend our existing cabinets with the new “Omaha cabinets” to make a new configuration work. There was only one cabinet missing (above the microwave), but we thought, “Oh, we’ll just figure something out.”

vintage St. Charles steel kitchen cabinets

The “Omaha set”

Just a week after moving in late January 2015, we rented a U-Haul trailer and drove to Omaha to get the cabinets. While the cabinets were shown installed in the original photos, by the time we arrived the kitchen was completely gutted. Our first task was to match the 20+ cabinets with their drawers and shelves to ensure we had a full set. As the sun set and the snow started to fall, we frantically packed up the cabinets in our U-Haul and headed back to Minneapolis in a full-fledged blizzard.

The cabinets resided in our garage for at least a month while we figured out what to do. In mid-February, we attended Modernism Week in Palm Springs, and upon returning, realized we probably needed to call in the professionals to make our kitchen plans a reality. So we engaged with Che Bella Interiors (a local design firm) to assist us in drawing up the new kitchen (including raising the soffits to accommodate the taller Omaha cabinets), selecting finishes, and serving as a general contractor for the remodel. Additionally, Roger was able to secure yet one more St. Charles cabinet to fit above the microwave from—believe it or not—Omaha! (His coworker, who resides in Omaha, was gracious enough to bring it to the Twin Cities for us.) When all was said and done, between our cabinets and the Omaha cabinets, we had enough cabinets for our new kitchen and a new mudroom!

vintage St. Charles steel kitchen cabinets

To repair and paint both our existing cabinets and the Omaha cabinets, Roger worked directly with Advanced Coating Systems (ACS) in Roseville, Minn. Almost all of the cabinets (except for a very large broom closet cabinet)—from both the original and Omaha kitchen—were taken to ACS’s shop and painted using two-part epoxy. The kitchen cabinets were painted green (Benjamin Moore’s “Thicket”), and the mudroom cabinets were painted red (Benjamin Moore’s “Mayflower Red”), almost an exact match to the original Terra Cotta red finish on the original cabinets and underneath the blue paint on the Omaha cabinets.. (Ironically, the blue Omaha cabinets had originally been Terra Cotta before they had been painted blue.) He also worked with LSV Metals in Spring Lake Park, Minn., to fabricate new metal trim (at the top of the cabinets) and any required “filler strips” between the cabinets to make everything fit. Those were also sent to ACS for painting.

As noted, ACS repaired and painted all of the cabinets in their facility, which were then installed by our contractor. (That was another fun challenge—especially figuring out how to reconfigure the metal frames which the cabinets sit on!) Upon installation, however, some flaws remained on the uppers (no surprise!), so ACS ended up coming to our home to re-paint the installed cabinets. The in-home painting process was done electrostatically. (The masked-off kitchen looked a bit like a Dexter kill room!)

false bottoms on st charles kitchen cabinetsundercabinet lights

Roger also coordinated with ACS and our electricians to add cut-outs for outlets and LED lighting—utilizing the false bottoms that originally housed under-cabinet lights [shown above with- and without the LEDs lit]. (Between the under-cabinet lighting, the abundance of roll-outs, and the mixer stand, the St. Charles company thought of everything!)

St. Charles challenges (that turned into victories):

  • Getting the right finish on the paint (embracing character flaws vs. expecting a ‘perfect’ finish repainting vintage cabinets considering their age and condition.)
  • Measuring/cutting the holes underneath the wall cabinets for the outlets and lighting
  • Measuring for the trim pieces above the cabinets, and determining how it would all fit together
  • Figuring out the filler strips

The finished kitchen:

Photo courtesy of Che Bella Interiors & Spacecrafting Architectural Photography.

Photo courtesy of Che Bella Interiors & Spacecrafting.

Photo courtesy of Che Bella Interiors & Spacecrafting Architectural Photography.

Photo courtesy of Che Bella Interiors & Spacecrafting.

Photo courtesy of Che Bella Interiors & Spacecrafting Architectural Photography.

Photo courtesy of Che Bella Interiors & Spacecrafting.

Photo courtesy of Che Bella Interiors & Spacecrafting Architectural Photography.

Photo courtesy of Che Bella Interiors & Spacecrafting Architectural Photography.

retro laminate

We love the boomerang laminate pattern on this original built-in desk area, with hairpin legs and a neat-o china cabinet topper.

vintage St. Charles steel kitchen cabinets

Q. How long did your kitchen remodel take, from start to finish?

We officially started demo in mid-June and wrapped up the majority of the remodel by early September (so, about 2.5 to 3 months). One major delay was caused by the Minnesota weather! Our home doesn’t have central air, and Minnesota summers are humid! We struggled to find a solution to get our humidity under control so that we could safely install the new hardwood floors. We also faced a few other delays typical to home remodel projects.

vintage St. Charles steel kitchen cabinetsvintage St. Charles steel kitchen cabinets

Q. Are the pendant lamps in the kitchen original to the house?

Yes—the pendants are original, as are the three(!) sputnik chandeliers. Additionally, we repurposed the flush-mounted lighting found in the upstairs hallway and bedrooms for new mudroom pendant lights.

vintage St. Charles steel kitchen cabinetsAbove: Notice how outlets are placed underneath the wall cabinets so that the backsplash is completely free of intrusions.

Kitchen resource list:

Bonus — the mudroom:

Mudroom before.

Mudroom before.

steel cabinets vintage

Mudroom after

Roger and Lynsey had enough leftover steel cabinets — a mix of the two sets — to give their mudroom a serious upgrade. As mentioned above, these cabinets also were taken to Advanced Coating Systems (ACS) in Roseville, Minn. and painted using two-part epoxy. This color is Benjamin Moore’s “Mayflower Red”, almost an exact match to the original Terra Cotta red finish on the original cabinets and underneath the blue paint on the Omaha cabinets..

Photo courtesy of Che Bella Interiors & Spacecrafting Architectural Photography.

Photo courtesy of Che Bella Interiors & Spacecrafting.

Photo courtesy of Che Bella Interiors & Spacecrafting Architectural Photography.

Photo courtesy of Che Bella Interiors & Spacecrafting.

vintage light fixturesteel cabinets vintage

Mudroom countertop laminate:Formica® Laminate Jonathan Adler Collection Crème Lacquered Linen, gloss finish, 9488-90 (Roger found it at the Kitchen and Bath Show shortly before moving into the house in January 2015.)

steel cabinets vintagevintage light fixtureSuch an improvement, and we love the original light fixtures!

Mega thanks, Roger and Lynsey, for sharing photos of your wonderful home and for taking the time to answer all of my many questions! I think we can all agree that your house is amazing and that you’ve both done a terrific job of keeping the original feel of the kitchen with your renovations. Here’s to another 60+ years of happy service from all those delicious St. Charles kitchen cabinets!

And readers, come back tomorrow, because we’re doing a standalone followup on their ingenious kitchen backsplash.

Link love photo credits:

The post One ingenious couple + two sets of vintage St. Charles kitchen cabinets = a gorgeous midcentury modern kitchen remodel appeared first on Retro Renovation.

Midcentury modern kitchen backsplash idea: Back-painted textured glass

$
0
0
midcentury modern kitchen

Photo courtesy of Che Bella Interiors and Spacecrafting.

If you have a midcentury modern style kitchen — and want to keep the kitchen backsplash as simple, yet functional, as possible, check out this super ingenious idea from Roger and Lynsey. Their “barely there” solution: Long runs of textured glass, back-painted to match their laminate countertop. 

Photo viewing tip: If you are on a desktop computer, click on the photo, and it should enlarge up to double in size on your screen, so that you can see more detail.

We wrote about Roger and Lynsey’s project to remodel their 1953 kitchen yesterday. Oh my: Those delicious St. Charles kitchen cabinets! Steel kitchen cabinets don’t get any better than these cabinets!

To complete their decisively midcentury modern look, Roger and Lynsey wanted a backsplash with just the right measure of minimalist style.

textural-glass-back-painted

Above: This is the back of the glass, painted.

Lynsey wrote:

We wanted something very clean looking, so we decided on solid sheets of glass with a small dotted pattern. (You can see the dots just ever so slightly in a few of the photographs.) The back of the glass was painted to match the walls, so in a way it looks like we don’t even have a backsplash.

architectural-glass-back-painted

Above: And here’s that same piece of glass seen from the smooth, front, unpainted side.

Alas, the project came with a hitch: The couple went through TWO backsplashes to get everything right.

What happened?

Yes, we put the textured side against the wall. The reason we did this is because when the textured side was out, it felt neat to the touch  … BUT it gave off this crazy hologram effect. You remember those little holograms you used to get in a Cracker Jack box? Well, that’s what the backsplash looked like when the textured side was on the outside.

And how do I know this? Because of the “first” backsplash. The contractor painted the wrong side and put the textured side out! (We actually specified it correctly since we were aware of the hologram effect from the sample … but then, I suppose, the contractor was like, “Who are these crazy people wanting to paint the wrong side?”) I walked into the kitchen halfway through the installation and thought I was going to have a seizure the hologram effect was so crazy! It was adhered using some kind of epoxy … quick setting, but not so quick that they couldn’t remove the first backsplash.

master-carre-glassThe product they used, screen shot from their website, above:

Here’s the glass we used: SGG Master-Carre Glass from Torstenson Glass Co.

Paint color on the back of the glass? Lynsey responded:

The paint color was the same as the kitchen walls — Sherwin-Williams Wool Skein.

backsplash-meets-window

In the bullet below, Lynsey explains how she had to finagle where the glass backsplash met the window.

Other challenges:

  • Overall length — The backsplash length was longer than the available length of glass. So, we had to use a few pieces, which created seams … and which wouldn’t have been a big deal, but we had to make sure the “dots” lined up so the rows looked straight. Roger added: If I recall correctly the longest piece of glass they could get was 120″, which is why there is the one seam on the left.

  • Un-level countertops — So, as you know with old homes, nothing is quite level … and our countertops (even though new) were still a bit un-level — not enough that things were rolling around on them, but enough that we had to cut the glass a bit “crooked” so that the dots would be parallel with the countertops.

  • Filling the gaps around the windows — Again, given the nature of the old house, the way the cabinets were installed, and the way the plaster “curves” around the window, the backsplash was a bit too long, leaving a gap behind it. We had to create L-shaped pieces to fill the gaps where light from the window was shining through the glass and casting shadows on the countertop. See last photo where everything comes together at the window. (PLEASE ignore the dirty window screens — ha!)

Finally, re installation, Roger recommends working with pros — and this sure sounds like the smart answer to me, too:

I would definitely consider this something you want to hire a professional for. Between cutting the glass to size, painting the back and installing, it’s a bit complicated. The glass is also tempered, so that it was strong enough to carry in the house for the installation.

Very nice, Lynsey and Roger!

The post Midcentury modern kitchen backsplash idea: Back-painted textured glass appeared first on Retro Renovation.

Boomerang laminate style melamine dinner plates

$
0
0

melamine boomerang platesTo be able to run the blog full-time — including paying Kate — I mostly make money from the ads. Another relatively small source of income is monthly earnings from Amazon. When I write about and link to products you can find there (which I always try to remember to disclose by calling out the link as an affiliate link), and readers click through and buy, I get a little spiff. Once you’re in via my link, I also get a spiff if you buy other stuff. At the end of the month, I can look through the reports on items sold — and sometimes I see other cool items you’ve discovered. Like: These melamine dinner plates with boomerang-laminate-style designs (affiliate link). They are just under 9″ square. Pretty cool — I might get two sets for picnicking at Tanglewood in the summer!

The post Boomerang laminate style melamine dinner plates appeared first on Retro Renovation.

Cathrineholm style melamine and stoneware dishes by Dansk at Bed Bath and Beyond

$
0
0

Cathrineholm style dishes

How’s this for some happy-hued plates, bowls, mugs and trays? Reader Susan commented on our recent story about boomerang laminate style melamine plates to give us this hot tip: Bed Bath and Beyond has a collection of Dansk dish ware called ‘The Burbs’ that looks pretty darn close to vintage Cathrineholm dish patterns. The dishes are available in melamine and stoneware — and wow — this stuff looks amazing. Plus, it is very reasonably priced so you can grab a whole set for less than you’d pay for a vintage original. 

Update, oh lookie, lots and lots on Amazon, too, this is just one set:

Susan commented:

Hi everyone, I just want to let all you mid century fans out there know that Bed Bath and Beyond has melamine Cathrineholm look a likes dishes, made by Dansk called The Burb, the collection is online only. The dishes are a super nice way of having some Cathrineholm for a very reasonable price, in fact very cheap. Check them out. I love mine.

Melamine dishes

Cathrine Holm style dishes

There’s a colorful large serving bowl…Cathrine Holm style dishes Cathrine Holm style dishes Cathrine Holm style dishes

A red, lime green and bright yellow plate and bowl set…Cathrine Holm style dishes

Coordinating small bowls…Cathrine Holm style dishes

Coordinating small plates…Cathrine Holm style dishes

And three sizes of trays.

Stoneware dishesCathrine Holm style dishes

In contrast to the warm colors of the melamine collection, the stoneware dish collection is decorated in blues, grays and green. You can get a three piece set with plate, bowl and mug…
Cathrine Holm style dishes

A 16 piece dinnerware set in starbursty blue and green…
Cathrine Holm style dishes

Coffee mugs in four fun designs…Cathrine Holm style dishes

Cathrine Holm style dishes

And coordinating extra plates and bowls, too!

Now the only question is, which pieces are your favorite?

Mega thanks to reader Susan for the tip!

And on Amazon, too:


The post Cathrineholm style melamine and stoneware dishes by Dansk at Bed Bath and Beyond appeared first on Retro Renovation.


Dozens of samples of vintage laminates from six companies in France: Celamine, Dilophane, Formica, Permalux, Plattan Perstorp, and Polyrey

$
0
0

retro formica francepermalux zig zagOh my word: Dozens of vintage laminate samples from five companies in France. Formica is the big name, but we also get to see designs from Celamine, Dilophane, Permalux, Plattan Perstorp (or is it Perstorp Plattan?), and Polyrey. Ebay seller rclark8449 generously gave me permission to grab the photos for our historical archive. He told me:

Hi Pam

I found these in a French village Vide Grenier they came from a hardware store so the vender told me.

All the best, Richard

SO FANTASTIC to see designs that, I presume, were designed and sold only in Europe. We want we want we want more designs like these back in the marketplace today!

The listings ended Sunday, and only one chain of samples seems to have sold.

Following are some of the overview shots… then, scroll down to the Gallery to see some closeups of these delicious designs.

formica from franceformica vintagefrance formica vintagefrench formica designsgraphic design formica francepermalux zig zagpermalux laminatepolyrey laminate

Link love:

Which is your new favorite?

Tips to view the slide show, click on any image … it should enlarge on your screen … use the back or forward arrows to move back or forth … hit Esc to exit … you can start or stop anywhere.

[See image gallery at retrorenovation.com]

The post Dozens of samples of vintage laminates from six companies in France: Celamine, Dilophane, Formica, Permalux, Plattan Perstorp, and Polyrey appeared first on Retro Renovation.

Terrazzio terrazzo floor tiles — 14 colors and 20 sizes, a lovely choice for a midcentury home

$
0
0

Terrazzo flooringIf you are on the hunt for new flooring for your midcentury home, we’ve got another option for you. Mega thanks to readers Jim, Suzanne and Wes for tipping us to Terrazzio. Made with traditional marble, Terrazzio is available in 14 standard colors with the additional option of working with the company to create custom color blends, too.

Terrazzio offers 20 different, large-format tile sizes from 24″ x 24″  to 96″x 48″ — allowing you to minimize joint lines and create a seamless look like original terrazzo without having to bring in a company that can pour a new terrazzo floor (if you can even find one!). While we will guess this stuff is spendy, my, is certainly looks to be beautiful — and oh so authentic for a midcentury modern house, condo, or apartment.

From the Terrazzio website:

Terrazzio is beautiful terrazzo, made with traditional marble, to present the warm pleasing variety of “nature” in a durable floor that will last the life of your building. Terrazzio is simply an ancient product, produced with modern techniques, in fresh colors and unique sizes to give the designer more options to create.

Terrazzio Benefits

  • Authentic Terrazzo
  • Very Large Format Tile
  • Fast Installation Time
  • Metazzio or Grouted Joints
  • Higher Quality Control of Tile over Poured in Place
  • 14 Standard Traditional Colors
  • Custom Colors Available
  • Custom Water Saw Cuts for Sweeping Curves
  • Low Maintenance Cost
  • Low Installed Cost
  • 20% Recycled Content
  • Building Lifetime Longevity

14 standard colors

Terrazzio is available in 14 standard colors to provide the designer greater creative opportunities. Unique floor patterns bring subtle, or dramatic, variety to the Terrazzio installation. Standard colors and standard sizes can be used together in any design.

Terrazzo flooring

Arctic White Terrazzio

Terrazzo flooring

Sterling White Terrazzio

Terrazzo flooring

Parchment White Terrazzio

Terrazzo flooring

Bleached Moss Terrazzio

Terrazzo flooring

Italian Blend Terrazzio

Terrazzo flooring

Nougat Red Terrazzio

Terrazzo flooring

African Pink Terrazzio

Terrazzo flooring

Beige Terrazzio

Terrazzo flooring

Cinnamon Yellow Terrazzio

Terrazzo flooring

Deck Gray Terrazzio

Terrazzo flooring

Gibraltar Gray Terrazzio

Terrazzo flooring

Onyx Mint Terrazzio

Terrazzo flooring

Moss Black Terrazzio

Terrazzo flooring

Baldwin Black Terrazzio

Custom Color Program
We can create any background color with your 2″ x 2″ color chip and we can provide a huge variety of colored stones to create the custom color you want. There is a $500.00 sample charge, and you will receive your sample in 45 days. This charge will be credited to your first 1,500 square feet of the custom colors.

Large Format Presents the Look of Traditional Terrazzo
Terrazzio is Large. We manufacture a 16-square-foot tile and a 32-square foot panel to provide the look of Authentic Terrazzo. Our single 4’ x 4’ tile covers the same area as 16 – 12” x 12” tiles. Terrazzio is available in 20 standard sizes, which promotes creative design freedom for innovative floor patterns. We also have Water Jet Cutting. If you can draw it, we can make it.

>> Read more about this product and get price quotes via the Terrazzio website.

The post Terrazzio terrazzo floor tiles — 14 colors and 20 sizes, a lovely choice for a midcentury home appeared first on Retro Renovation.

The Smith house on Pinocchio Street in Dallas — drop-dead gorgeous, no lie! — 36 fun photos

$
0
0

Sneak peek: Goes on sale Thursdaymid century modern Smith house dallas

Which photo to to lead with? The front with the pink Cadillac? Or the back, with Bob’s Big Boy guarding the pool? Now those are decisions I don’t get to make every day! Thanks to our good friend Ed Murchison, midcentury modern house realtor extraordinaire, we are getting a sneak peak at the gorgeous 1954 “Smith House” in Dallas. Designed and built by Gordon Nichols, it sits on Pinocchio Street among a whole bunch of other “Disney Streets.” The Caddy is just ONE hint of the fun inside and out back: Just keep on scrolling, we have 36 fun and fabulous photos courtesy Shoot2Sell Photography.  

11016-pinocchio-dr-dallas-tx-MLS-30

Note to view photos: If you are on a desktop, you should be able to click on any photo and it will double in size on screen.

All about The Smith House, from the listing:

Come immerse yourself in the true Mid-century Modern vibe that is so widely sought and so difficult to find. Designed and built by the famed Gordon Nichols, the home at 11016 Pinocchio Drive known as the Smith House, is among the best of the Mid-century Modern houses in the highly desirable Disney Streets. The house was one of the featured homes during the highly successful 1954 Parade of Homes which highlighted the latest modern conveniences and building materials. [Ed tells me that more than 100,000 people visited the house during the 1954 Parade of Homes!]

11016-pinocchio-dr-dallas-tx-MLS-1

Its low-slung roof and expansive horizontal feel represent the goal of many builders and architects in the postwar era to offer flexible seamless indoor and outdoor living spaces. The roughly T-shaped house set on a generous lot projects the garage out toward the street and the family bedrooms to the rear of the house. A large master bedroom suite occupies the south end while the kitchen, dining room and two spacious living areas are in the center of the house. The open concept living areas feature vaulted ceilings, exposed beams and cool MCM features such as the Nelson Bubble Lamp in the dining room. The kitchen…is just wow featuring the original cabinetry, vintage pink appliances and Formica counters. This is the real deal…no cheap builder-grade granite here. A unique design element is the brick fireplace, providing what the builder described as a “visual center” in the front entry hall.

11016-pinocchio-dr-dallas-tx-MLS-311016-pinocchio-dr-dallas-tx-MLS-4

All of the principal living spaces as well as the master bedroom and guest bedrooms all open to the covered lanai and terraced decks affording views of the refreshing pool. Once you step out to the south lawn that includes the pool area, blink your eyes and you may think you are in Palm Springs…or on the set of Mad Men! If it is a peaceful spot to enjoy your morning coffee that you seek, the north lawn features a private deck just off the dining area. In addition…there is a separate guest suite providing a perfect place for guests or a family member that desires their own private space.

With so many original features and thoughtful touches, the Smith House is a truly special and unique Mid-century Modern home. Slip on your smoking jacket, turn on the Sinatra and pour yourself a martini…your home!

Basics:

  • Four bedrooms, 3.1 bathrooms
  • 2,260 s.f.
  • $665,000

Open house: Thursday, September 08, 2016 – 5:00 PM – 7:00 PM

11016-pinocchio-dr-dallas-tx-MLS-15
Folks are asking about the pot rack:

It’s an Enclume Whisk (affiliate link)

11016-pinocchio-dr-dallas-tx-MLS-14 11016-pinocchio-dr-dallas-tx-MLS-13 11016-pinocchio-dr-dallas-tx-MLS-12This is not an original-owner house. But whoever got their hands on it most recently knew (1) WHAT TO LEAVE ALONE, and (2) how to have A Blast bringing the bones of this delicious home to life!

11016-pinocchio-dr-dallas-tx-MLS-1111016-pinocchio-dr-dallas-tx-MLS-911016-pinocchio-dr-dallas-tx-MLS-1011016-pinocchio-dr-dallas-tx-MLS-811016-pinocchio-dr-dallas-tx-MLS-611016-pinocchio-dr-dallas-tx-MLS-711016-pinocchio-dr-dallas-tx-MLS-2511016-pinocchio-dr-dallas-tx-MLS-2411016-pinocchio-dr-dallas-tx-MLS-23There is color — and fun furniture and art — everywhere!

11016-pinocchio-dr-dallas-tx-MLS-2111016-pinocchio-dr-dallas-tx-MLS-22 11016-pinocchio-dr-dallas-tx-MLS-26 11016-pinocchio-dr-dallas-tx-MLS-27There are original bathrooms with, I think, just a leetle sensitive updating, which I’m guessing was likely required for wear-and-tear reason…

11016-pinocchio-dr-dallas-tx-MLS-1611016-pinocchio-dr-dallas-tx-MLS-1711016-pinocchio-dr-dallas-tx-MLS-18The living room is cool and inviting…

11016-pinocchio-dr-dallas-tx-MLS-31 11016-pinocchio-dr-dallas-tx-MLS-3611016-pinocchio-dr-dallas-tx-MLS-3411016-pinocchio-dr-dallas-tx-MLS-33 11016-pinocchio-dr-dallas-tx-MLS-3211016-pinocchio-dr-dallas-tx-MLS-30 11016-pinocchio-dr-dallas-tx-MLS-29 11016-pinocchio-dr-dallas-tx-MLS-28But the horrible dilemma: Spend all your time inside — or outside???

11016-pinocchio-dr-dallas-tx-MLS-2011016-pinocchio-dr-dallas-tx-MLS-19Suddenly, I need a George Nelson Marshmallow headboard — surely a hack??? — with matching Marshmallow sofa. Surely genius!

11016-pinocchio-dr-dallas-tx-MLS-35But what I mostly now neeeeeeeeeed me is a Big Boy! Where the heck do I get one of these?

THANK YOU, Ed Murchison, for giving us a heads up on this one — it’s fabulous! And thanks, again, to Shoot2Sell for the great photos — we can only guess how much fun you had on this one!

Link love:

So here’s a parlor game for us to play:
Readers, can you name all the designs/designers
whose products are featured in this house?
One item per comment, please.
No Repeating! Read the comments first!

The post The Smith house on Pinocchio Street in Dallas — drop-dead gorgeous, no lie! — 36 fun photos appeared first on Retro Renovation.

Vintage GE kitchen cabinets installed with a modern twist — I love it!

$
0
0

Steel kitchen cabinetsDo you love vintage steel kitchen cabinets, but want to use them in a more contemporary way? Well, consider this brilliant idea from my brother and sister-in-law, who recently completed a major gut-remodel renovation and restoration of a gorgeous mid-century modern house. The home has an attached guest room with its own entrance. For the kitchenette area, they used vintage GE steel kitchen cabinets original to the main house — and wrapped them in a “waterfall” of solid surface of countertop to bring them in line with the retro-contemporary design of the entire project. They even were able to tuck in a little refrigerator-freezer. I love it!

dbi_zodiaq_color-chip_coarse-carrara-690x345Above: The countertop is Zodiaq Course Carrara.

My brother asked me for an aqua color to repaint the cabinets. I pointed him the Sherwin-Williams Suburban Modern collection Holiday Turquoise. But, I see they lightened it up a bit. I didn’t get the full story on how they repainted the cabinets — I was there one day when I saw some of the painting going on — I think they went a cheap and cheerful route and just had their contractors prime and paint the selected cabinets one day when there was downtime between throwing boatloads of money at all the other gazillion issues. They had to gut remodel, because of so many structural issues that needed to be dealt with. The house is absolutely gorgeous. Professional photos to come, and my brother says I can show them on the blog!

Meanwhile, this little happy-happy from other family members who’ve been bit by the mid mod mad bug. 🙂

The post Vintage GE kitchen cabinets installed with a modern twist — I love it! appeared first on Retro Renovation.

Shirley All-Steel Kitchens of Indianapolis, Indiana

$
0
0

Shirley Steel Kitchen Cabinets Indianapolis INNow that Kate has flown my coop, I have decided to embark on a new project: Creating The Retro Renovation® Encyclopedia of Vintage Steel Kitchen Cabinets. Collected over the course of 10years — often with the help of many readers — we know all the 80 brands, from Ace & Acme to York & Youngstown. I have many of the brochures. Now, it’s time to become best friends with my $900 scanner and get the Encyclopedia organized. First up: Shirley All-Steel Kitchens, of Indianapolis, Indiana. It’s first because it was sitting at the top of my pile. For, like, six months.

Tip to view photos: On a desktop computer, click on any photo and it should double in size (up to 1,000 pixels wide) on screen. Hit ESC or anywhere off the photo to return to the story.

Shirley Steel Kitchen Cabinets Indianapolis INAccording to my 16-page catalog, Shirley All-Steel Kitchens were made by the Shirley Corporation– and clearly, this was a family venture because the president was John W. Shirley. His obituary was published in the Indianapolis Star on Oct. 23, 1985. (A credit card was required for the free trial, so I ditched.)

I’m guess that Shirley Corp. was a descendant company or renaming of Shirley Radiator and Foundry Co.

Shirley Steel Kitchen Cabinets Indianapolis IN
Features that may distinguish this brand from others:

  • Surely (Shirley!): The logo on the sink cabinet
  • + Look inside the sink base door, there may be a label
  • Likely: the air vents on the sink cabinets
  • Likely: the steel sink designs (see p. 7 for its feature) — Shirley likely had their own stamping press just for their sinks
  • Possibly: the what not shelf (see p. 14)
  • Possibly: very simple cabinet pulls

Other than these… this kitchen looks to be a pretty “standard” design — full overlay slab doors with knife hinge… cabinets in a variety of sizes… simple looking cabinet pulls.

Made a bathroom vanity, too:

  • BUT also check out this steel bathroom vanity — steel bathroom vanities are rare, and this one also includes a steel sink-top and groovy door pulls — and it’s pink — nice!

The circa 1952 Shirley Steel Kitchen Cabinets catalog:

Shirley Steel Kitchen Cabinets Indianapolis INShirley Steel Kitchen Cabinets Indianapolis INShirley Steel Kitchen Cabinets Indianapolis INShirley Steel Kitchen Cabinets Indianapolis INShirley Steel Kitchen Cabinets Indianapolis INShirley Steel Kitchen Cabinets Indianapolis INShirley Steel Kitchen Cabinets Indianapolis INShirley Steel Kitchen Cabinets Indianapolis INShirley Steel Kitchen Cabinets Indianapolis INShirley Steel Kitchen Cabinets Indianapolis INShirley Steel Kitchen Cabinets Indianapolis INShirley Steel Kitchen Cabinets Indianapolis INShirley Steel Kitchen Cabinets Indianapolis INShirley Steel Kitchen Cabinets Indianapolis INShirley Steel Kitchen Cabinets Indianapolis INShirley Steel Kitchen Cabinets Indianapolis INShirley Steel Kitchen Cabinets Indianapolis IN

Above: A close-up look at the Formica options. Countertops also were available “in any standard gauge linoleum or maple wood…”

Shirley Steel Kitchen Cabinets Indianapolis INShirley Steel Kitchen Cabinets Indianapolis IN

The post Shirley All-Steel Kitchens of Indianapolis, Indiana appeared first on Retro Renovation.

Get the look of mother of pearl / cracked ice laminate with Wilsonart Crystalized White

$
0
0

wilsonart-crystalized-whitecracked ice laminateIf you love the look of old mother of pearl aka cracked ice or crackle ice laminate, I found a new version — Wilsonart’s Crystalized White — that is a decent proxy and could be a great choice for a Retro Renovation kitchen or bathroom countertop, especially if you want something neutral but with with some abstract multidirectional pattern — i.e. motion.

It’s part of Wilsonart’s growing Virtual Design Library (where our Retro Renovation® by Wilsonart series also is made!)

Of course, if you want color crackle ice, you can still get that, too, in red, yellow or gray — and hey, I think these area lso made by Wilsonart. See our story on the cracked ice laminate options here.

The post Get the look of mother of pearl / cracked ice laminate with Wilsonart Crystalized White appeared first on Retro Renovation.

Streaky jaspe style vinyl sheet flooring — could be great for a retro-modern home

$
0
0

rm_raeburn_532Obsessively searching to find new vinyl flooring for my basement, I ran into this new design — “Raeburn” from IVC’s Flexitech @ Work Collection Astro series. I love how IVC has reimagined the classic streaky jaspe vinyl tile into this larger polygons-into-square design. The color looks pretty nice too — I am a beige person, not a gray person, and there’s been a real dearth of beige in the market for the last 5-8 years. This flooring is an IVC Commercial flooring and comes in 13’2″ widths — nice! I would call this a nice choice for a retro-modern home. Nice floor!

rm_raeburn_591Oh, and for those of you who prefer gray, they have that too.

Remember: When looking for flooring options, be sure to check the commercial section of manufacturers’ websites! Big roundup: 25 companies that make flooring — cork, linoleum and vinyl — suitable for a midcentury house.

The post Streaky jaspe style vinyl sheet flooring — could be great for a retro-modern home appeared first on Retro Renovation.


Interviewed by the Washington Post about TV tray tables … What do you think of these oldies but goodies?

$
0
0

vintage-tv-trays-quakerThe Washington Post’s home and design reporter Jura Koncius recently emailed me, wanting to talk about TV tray tables. She was working on a feature to go with the launch of the new fall TV season: a what’s-old-is-new-again look at these throwbacks to the early days of television and how they still might relate to our lives today. Did I use them? What did I know about them? Are folks into them? It was a lot of fun talking to her! Read her story here.

And then, Open Thread:

Do you use TV tray tables? Do you have stories about growing up with them? Are you on the lookout for vintage, like the set above from ebay seller heathers684 (affiliate link). Even: What are you watching on TV this season that you’d like to recommend?

The post Interviewed by the Washington Post about TV tray tables … What do you think of these oldies but goodies? appeared first on Retro Renovation.

Ondrea and James’ English Rose kitchen: Two sets refurbished into one joyful remodel!

$
0
0

english-rose-kitchen-11english-rose-kitchen-25English Rose metal kitchen cabinets: One of three brands we’ve identified as made and sold in England — and, still made today! But being a U.S.-based blog, we have mostly U.S. readers (84%), so it’s only now and then that we get to read about Retro Renovations from across the pond. And what a delightful story this is: Ondrea and James paired up, and soon enough, were feathering their Bristol, UK, nest with a “new” kitchen. In this case: combining two sets of vintage aluminium — (in U.S. talk, aluminum) — English Rose kitchens into one… and there’s lots to the story, of course!


english-rose-kitchen-21Edited a bit for flow, Ondrea writes:

Hi Pam,

I’m not sure where to start! I moved into my two bedroom bungalow, as I was downsizing after three of my four children had flown the nest. My 26-year-old still lives with us. I grew up in this area, and the bungalow is in a great location — very near the Bristol harbour, Ashton Court and the suspension bridge.

The bungalow from the outside looks very unassuming  (like a wooden shed)! and lacked in character, being a 15-year-old newish build. I knew that one day I would have to add something to make it unique and not just a granny bungalow  –  yes, I also have have grandchildren.

I’ve always had a love of anything vintage, I enjoy flea markets and charity shops. 1950s is my favourite.

I was lucky enough to meet James three years ago, and we have many shared interests. At the beginning of this year. we decided to sort out the bungalow kitchen. We looked around all the shops that sell modern units. I thought they were all similar to each other and not built to last and that they cost a fortune. At first we discussed James’ making wooden units to look 1950-60s.

english-rose-kitchen-4

Then I spotted a set of English Rose on eBay. It was February, and I had teased James for not being very impulsive (he’s a deep thinker likes to plan properly!) So there and then — sitting on a bus — he bought the first set of units online. I cried with emotion (sounds silly I know) — best Valentine’s gift I ever received.

English  Rose is made from aluminium! It’s lighter than steel and doesn’t rust, also it’s the metal that was left from Spitfire aircraft.

(Pam here:) As often is necessary in projects using vintage metal kitchen cabinets, the couple needed to buy two sets of cabinets — or cupboards, in UK-lingo! — to get the number and configuration they were aiming for. I’ve heard from some Retro Renovators who have purchased three kitchens — and from those we have “finished” but are still looking for one rare piece.

english-rose-kitchen-12Ondrea continues:

We bought two batches of cupboards from eBay and sprayed them all to match. One kitchen came from Cornwall (cream & red), and the other, from London (blue & green).

english-rose-kitchen-26

The next few months were very hard work. We took them all apart like a giant meccano set and sprayed  everything!

english-rose-kitchen-10

We didn’t use any outside contractors in at all. James did all of the work himself, the spray paint, flooring, tiles, shelves, even sewing the curtain hems. He’s such a star!!

english-rose-kitchen-13english-rose-kitchen-16

The finished kitchen, the cooker is 1960’s — a “Creda Carefree” — a bit modern! Curtains and clock are original 1950’s.

english-rose-kitchen-22

I also found this lovely 1960s larder.

english-rose-kitchen-17

When James moved in with me his most treasured possession for sentimental reasons was a 1950s radio that belonged to his friend Keith. Keith has passed away now — he was unable to use the radio so new-in-box as he had cerebral palsy. Now we have a whole kitchen to match!

***

english-rose-kitchen-24

Wow. Just wow. Ondrea and James, I adore your story, your kitchen, and your touching tribute to Keith. You are our dose of love and joy to start the week! Congratulations on feathering your nest so creatively — and beautifully. And thank you for sharing your story and photos with us!

anemone kitchen cabinetsRead more about vintage metal kitchen cabinets from the UK:

And don’t forget, all’s being built and tracked in the:

The post Ondrea and James’ English Rose kitchen: Two sets refurbished into one joyful remodel! appeared first on Retro Renovation.

English Rose-vintage-style kitchen cabinets from John Lewis of Hungerford

$
0
0

red-white-vintage-style-kitchen-english-rose-john-lewisSince I first wrote about the English Rose-style metal kitchen cabinets made by John Lewis of Hungerford in the wee early days of the blog — 2008, there has been an explosion of interest in midcentury interior design. And, online marketing has improved greatly, too. After yesterday’s story about Ondrea and James’ new kitchen using vintage English Rose cabinets, I went back to check for any updates to the John Lewis of Hungerford page and indeed, found several gorgeous new examples. Their PR team gave me permission to grab them for the blog, so here’s a look at some recent projects by the company. It’s interesting to see some of the contemporary design elements used — while at the same time, it’s undeniable that the underlying retro English Rose vibe is calling the shots. 

john-lewis-of-hungerford-creme-de-la-creme-kitchen-cabinets

creme-de-la-creme-john-lewis-of-hungerfordDigging into the website, I see these were introduced in 2005. While they have the look of vintage English Roses, I count them as an all-new brand since they were “inspired by” and are not marketed as reproductions per se.

english-rose-kitchen-cabinets-from-john-lewis-of-hungerford

These beauties are not likely to come inexpensively. From the website, it sounds like they are made-to-order.

english-rose-john-lewis-of-hungerford-kitchen-cabinets-2

For more information on Creme de la Creme kitchen cabinets from John Lewis of Hungerford

The post English Rose-vintage-style kitchen cabinets from John Lewis of Hungerford appeared first on Retro Renovation.

Vintage English Rose kitchen aluminium banquette seats

$
0
0

english-rose-kitchen-1It’s an English Rose kitchen hat trick — three days of stories about these wonderful vintage design kitchen cabinets made and sold in England back in the day. Today’s finale: Photos of vintage banquette seats — a feature that I have never seen offered in vintage steel kitchen cabinets that were made and sold in the U.S. Reader Sarah sent me these photos four years ago, when she had them for sale. Yes — gulp — four years ago — good thing I never throw anything out including emails. I think they are soooooo coool!  And lookie this —>>>>

english-rose-kitchen-2

The “kitchen seats”, as Sarah called them, open up for storage inside! Those crafty Brits!

Thank you, Sarah! P.S. Sarah told me they were sold long ago….

The post Vintage English Rose kitchen aluminium banquette seats appeared first on Retro Renovation.

Mannington Progressions Vinyl Composition Tile — the red, yellow, blue and black are retro winners

$
0
0

red-floor-tile-2Always on the search for retro flooring options, I ordered some samples from Mannington’s Progression line of 12″x12″ vinyl composition tile. There were several colors that looked like they could work for a vintage-era kitchen, basement, or even living room. Sure enough: I declare winners among:

  • red-floor-tile-155228 New Geranium — a wonderful apple red…
  • 55503 Banana Cream — a nice but not cloying yellow…
  • 55170 Duchess Blue — a crisp classic blue…
  • and 55101 Classic Black — although I’d compare that with the more streaky, super scrumptious Armstrong Standard Excelon Imperial in Classic Black, which has been around for decades, before making a final decision.

Note: I ordered these samples a while back. They’ve been sitting on my desk waiting their moment in the sun. Now that I go back to look at the site, I see there are some new colors. Check them out — my experience is that the image online and the tile in-hand look pretty different.

Link love:

The post Mannington Progressions Vinyl Composition Tile — the red, yellow, blue and black are retro winners appeared first on Retro Renovation.

Viewing all 371 articles
Browse latest View live