Quantcast
Channel: Kitchen Archives - Retro Renovation
Viewing all 371 articles
Browse latest View live

Robert and Caroline’s mid century home with dreamy St. Charles kitchen cabinets

$
0
0

vintage-steel-kitchen-cabinets

Robert and Caroline

Robert and Caroline

By now, most of us have seen the inspiring photos from Sarah’s Gilbert Spindel round house, but did you know: Sarah’s parents also became new owners of a marvelous 1953 mid century ranch house last year. The house boasts many of the original details, including furniture and decor left by the original owner. And, when the kitchen and bathroom needed some attention before Robert and Caroline could move in, Sarah was able to give them some great decor advice and also point them in the direction of the many resources available here on Retro Renovation. The result: Another retro remodel well done.

mid-century-houseSarah writes:

It all started last Christmas, when my parents and I were invited to a new friend’s house for a party. Immediately my Mom and I started drooling over the architecture and period details in the house. The house was exactly my parents’ style. We joked with the owners that whenever they plan to sell in the future to give us a call. Little did my parents know that three months later that very call would come. Even though it was sudden my parents jumped on the opportunity. My parents ‘refreshed’ the kitchen and one of the bathrooms last year before moving in.

model-of-mid-century-house

Model of the home 1953.

[The house was ] built in 1953 by Mrs. Helen Weber McGehee heiress to a lumber fortune. She had the house built with the best quality lumber, but insisted on planting no trees. Trees were simply for making money not enjoying. She only lived in the house for a couple of years before moving. She left everything. She took her clothes and a few personal mementos and left everything else! That is why a few pieces have been left behind from all of the past owners.

retro-courtyard-mid-centuryasian-statue-mid-centuryThe house features a central courtyard with a beautiful marble statue of a ‘teaching Buddha’ that Mrs. McGehee may have bought or had commissioned along with the marble mantle in the formal living room.

modern-traditional-living-roomvintage-mirrors-entry-way
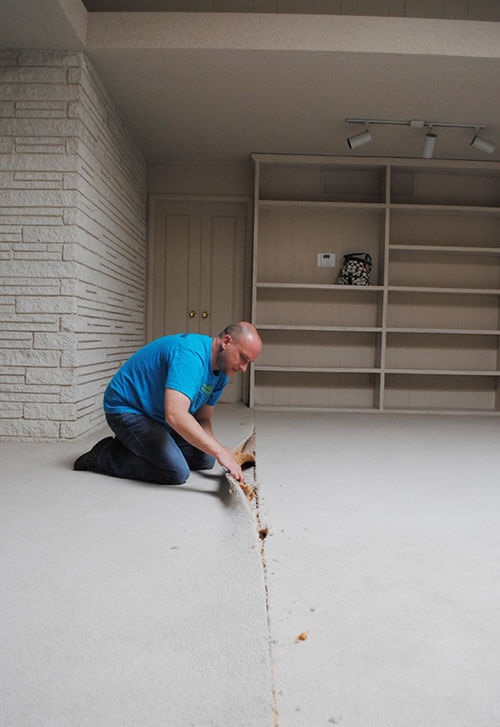
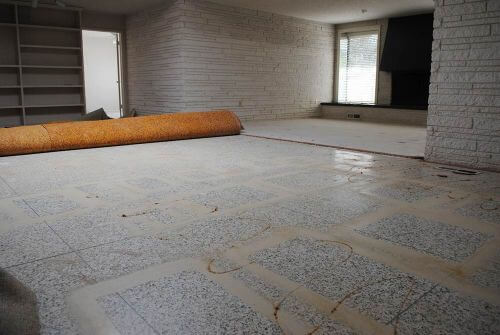
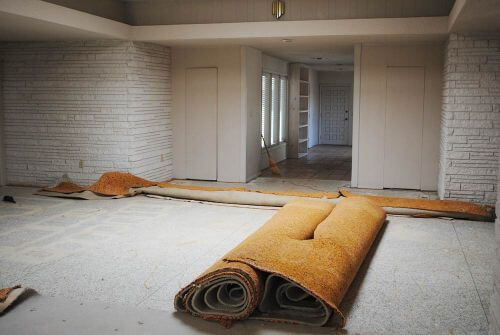
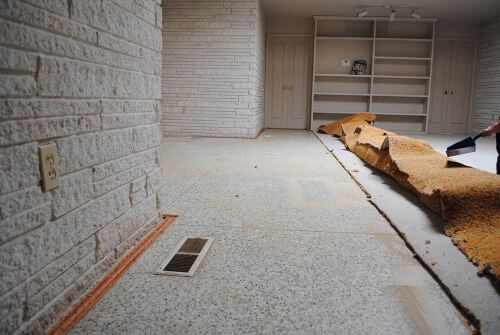
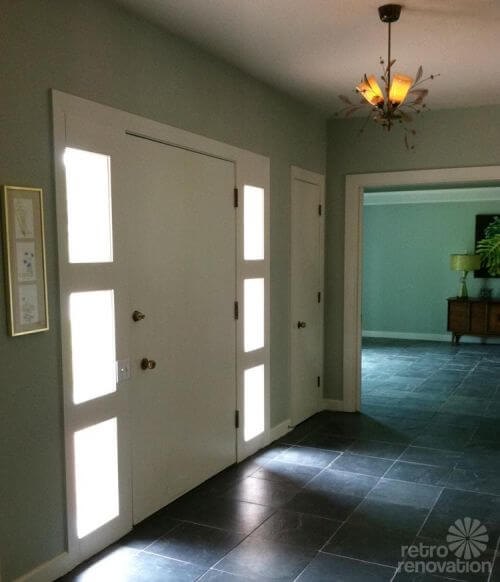
The shell motif on the mantle is also repeated on the original table and mirror sets in the entrance. The previous owners installed the slate flooring in the home, it was originally wall to wall carpeting in those rooms. According to those who remember, the house was originally mainly painted and decorated in green.

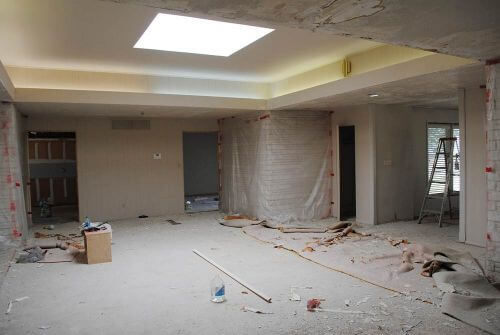
Although the paint colors have changed over the years, luckily for having had four or five previous owners, no major renovations were ever made to the house. The house was in overall great condition, it only needed a little bit of TLC.

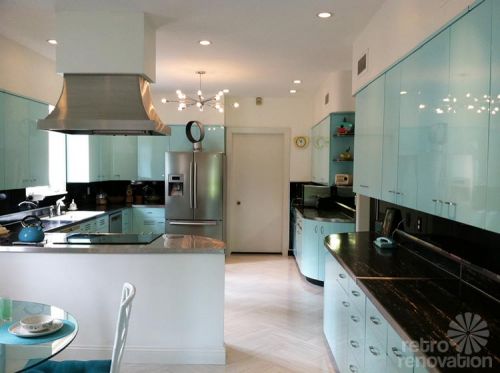
Kitchen freshening — original St. Charles steel kitchen cabinets

mid-century-steel-kitchen-cabinets-whitemetal-kitchen-cabinets
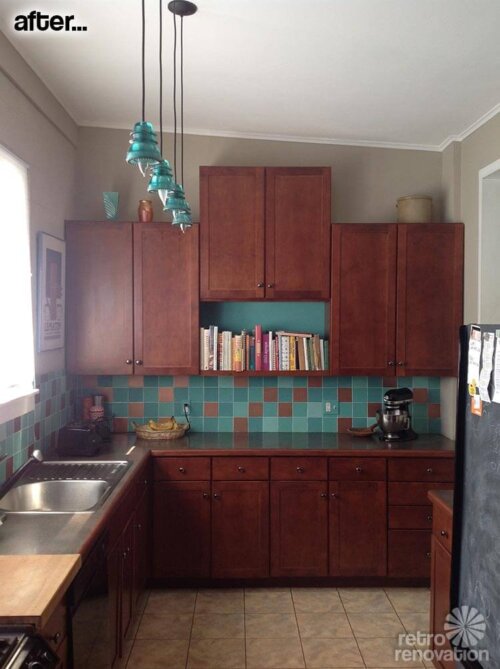
The kitchen is any Retro Renovation reader’s dream. 1953 St. Charles cabinets as far as the eye can see! This is a big kitchen by today’s standards, so I imagine that it must have been quite the show stopper in its day.

retro-metal-kitchen-cabinets
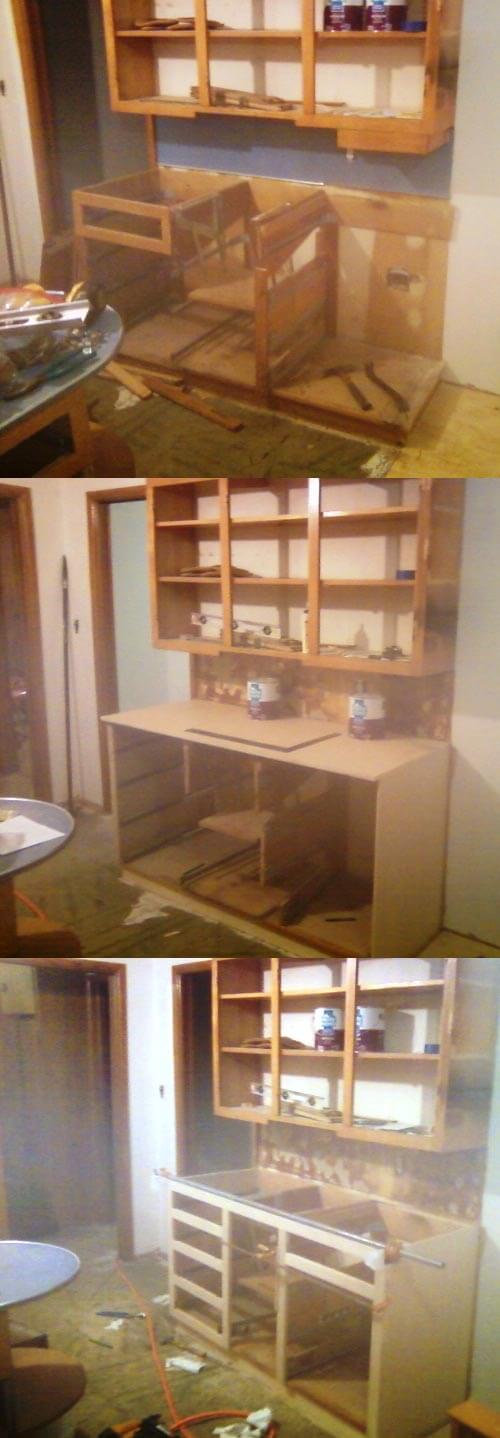
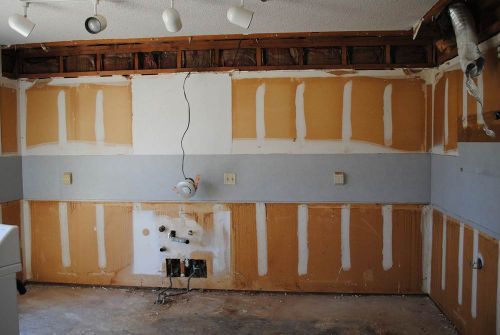
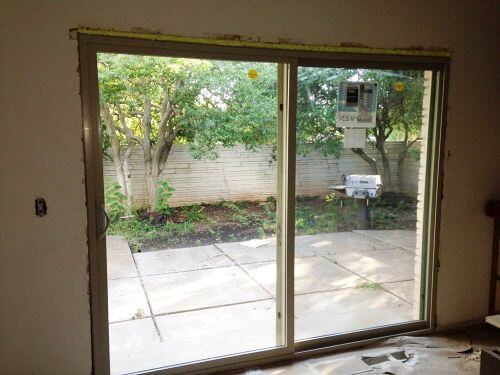
But after 60 years of daily use some of the original paint was worn down to the primer, especially around the handles. And the peel n stick vinyl floor was peeling up and needed to go.

painting-vintage-kitchen-cabinets painting-vintage-steel-kitchen-cabinetsBecause I’m a regular Retro Renovation reader, I knew exactly what needed to be done. One of our friend’s husband is an auto body painter and was up for the job, even though he had never painted metal cabinets before. He and his friend worked on the project on the weekends. The doors and drawers were removed and painted at their booth. They also worked on any dents or warps. The cabinet boxes were painted on site. Everything was taped off and overall it didn’t create much of a mess. We used PPG auto paint and it really shines just like a new car off the assembly line.

vintage-aqua-kitchen-cabinets We used Armstrong’s Striations line in the “atmosphere” color for the floor. It’s streaky like vintage VCT but comes in the modern 12″x24″ size. We experimented with about five different ways of laying out the floor tile and went with a herringbone pattern.

mid-century-steel-kitchen-cabinetsvintage-aqua-kitchen-steel-cabinets vintage-curved-kitchen-cabinetsThe floor was sealed and a matte coating applied.

mid-century-modern-kitchen vintage-steel-kitchen-cabinets

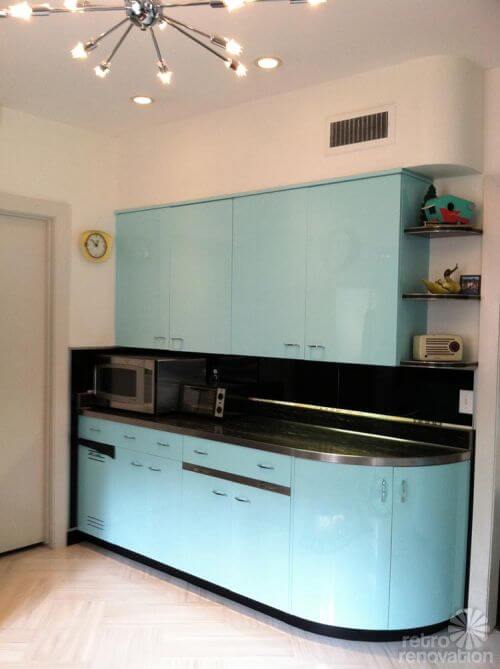
The countertop is the original laminate or maybe cusheen? Its a very thick laminate and it has a slight give, that’s why I think it may be cusheen but I have no basis of comparison. The stove area has a stainless steel countertop. The backsplash is the same material as the countertop, maybe 3 or 4 inches high, then edged in aluminum or stainless, then a solid black glass the rest of the way up. (all original) Mom placed the remaining liner tiles on that edge just for decoration, they aren’t secured.mid-century-modern-aqua-kitchen

vintage-meadowcraft-patio-set meadowcraft-vintage-chairThe vintage dining set is the same table and chair set that was in the kitchen on The Golden Girls.

aqua-kitchen-vintage-sputnikThe finishing detail was replacing the old light fixture for the new chrome Sputnik chandelier — which was purchased from Practical Props — a company I also found through Retro Renovation. The kitchen has endured 60 years of use and is now ready for 60 more!

Bathroom Remodel

vintage-bathroom-before
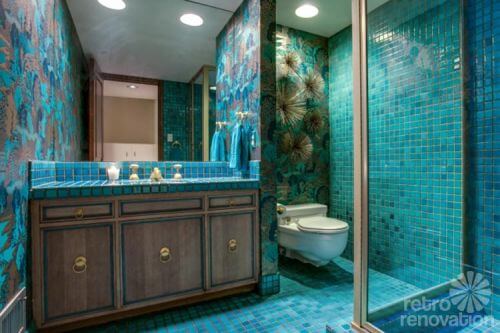
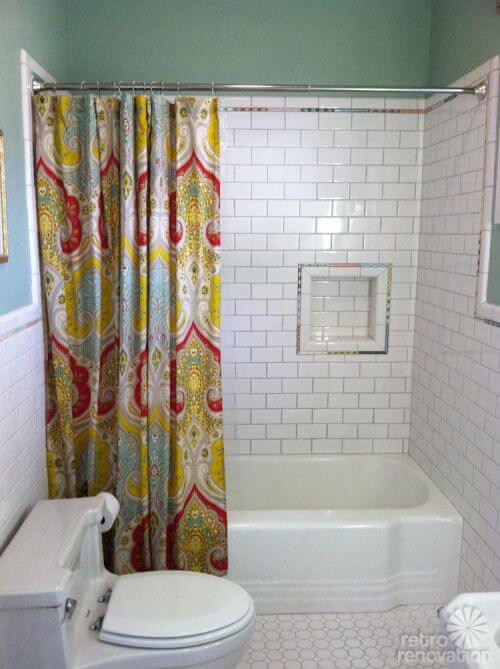
The house has 3 1/2 bathrooms. A bathroom for every bedroom, which must have been quite the luxury. All of the bathrooms were original and so unique but the brown and white bathroom left much to be desired. The brown tile seemed to have a permanent layer of hard water residue, some of the tiles were cracked and overall we weren’t fans of the color scheme.

vintage-decorative-liner-tilesThis is also the only bathroom with a standing shower, so it was going to be used the most. We decided to just redo the tile work and to keep the new look in style with the other bathrooms in the house. We kept the tub, toilet, sink and medicine cabinet as well as the layout. We tossed around several design ideas and shopped around town and the Internet for inspiration.

decorative-liner-tiles

Sarah’s bird Basil also helped select the liner tile.

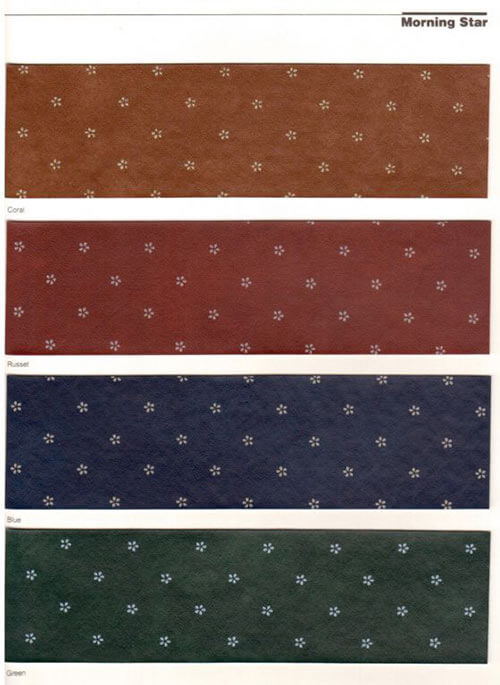
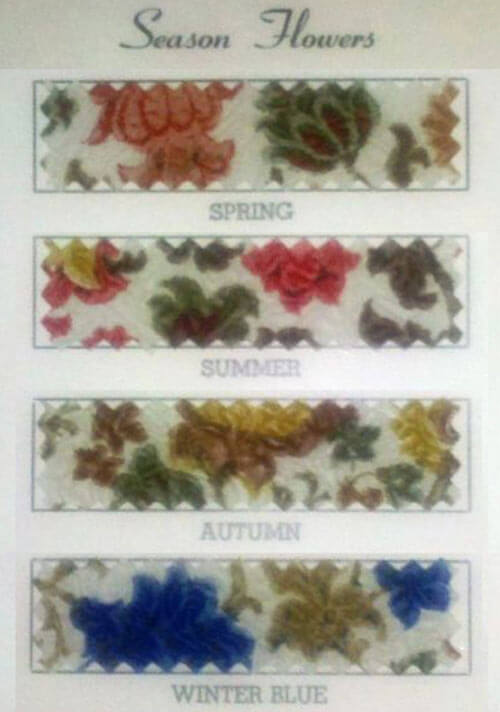
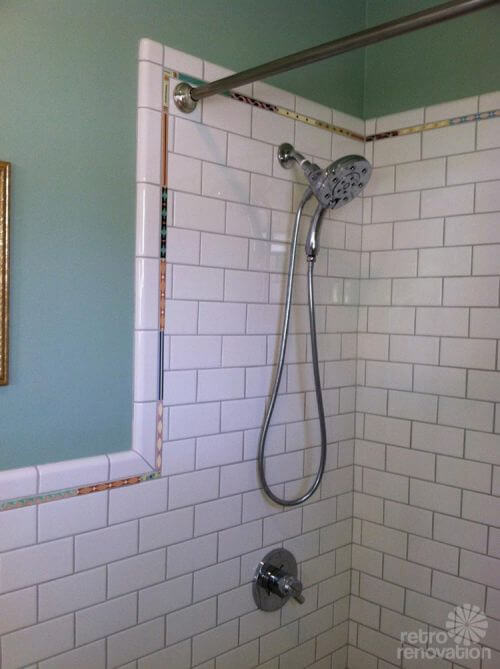
While browsing the vintage tile selection on eBay I stumbled upon a massive lot of vintage sizzle strips in a multitude of colors and patterns. From that I thought it would be a really fun look to go wild with a crazy assortment of strips while keeping the rest of the look classic and clean.

colorful-groutWe sampled several colors of grout but went with light gray.

building-shower-niche vintage-white-bathroom vintage-tile-shower vintage-liner-tile-shower-niche vintage-subway-tile-shower vintage-modern-bathroom The advantage of using the white subway tile and bullnose is that it’s easy to find and relatively cheap. We pulled ours straight off the shelf at Lowe’s. Now the bathroom is very customizable. Just about any color can be pulled from the sizzle strips for wall and towel colors.

yellow-retro-tiled-bathroom vintage-yellow-tiled-bathroom vintage-yellow-tile-bathroomThe bumble bee yellow bathroom is a twin of the redone bathroom, same size and layout. One can’t help but perk up in such a sunshiny space!

mirrored-bath-vanity-retro-mod retro-mirrored-bath-vanityThe master bathroom has the most amazing mirrored vanity. I’ve never seen anything quite like it.

retro-mirrored-countertopAnd when you open one of the fabulous mirrored cabinets you will find a bottle of Windex because it is a daily necessity.

vintage-white-and-green-bathroomIt also has a white princess tub and coke bottle green hex floor tiles.

vintage-green-bathroom-sink vintage-mirrored-bathroom-vanity vintage-wallpapered-bathroom vintage-wallpaperThe half bath is a wild little nook with its harlequin wallpaper, blue fixtures and pearloid toilet seat. I love the one playing guitar! I’m not sure if the toilet seat changed color over time but it is a bit greener than the toilet.

mid-century-slate-entryway vintage-light-fixtureAlthough my parents love their new house’s welcoming layout and abundance of natural light, they really appreciate their new neighbors and neighborhood. Their neighborhood boasts charming cottages, mid century modern gems and older southern style homes all under a canopy of large mature oaks. The neighbors switch off on hosting monthly block parties and are most often seen jogging and walking their dogs. It’s a retro neighborhood in the best way.

vintage-ceiling-medallion retro-modern-living-room mid-century-modern-sofaMega thanks to Sarah, for taking all of the photos and sending in the back story of her parent’s lovely house. Robert and Caroline — what a gem you have. Your kitchen is just to die for — and the bathrooms are superb. Thank you so much for opening up your home to all of us for this spectacular tour. It is great to know that this special home has caretakers that appreciate and preserve the fabulous original details.

Resource list:

  • Kitchen cabinet paint — PPG Automotive paint — Boxes painted on-site, doors and drawer fronts painted offsite in professional spray booth
  • Kitchen flooring — Armstrong Striations flooring
  • Kitchen starburst light –
  • Bathroom wall tile — Subway tile off the shelf from Home Depot
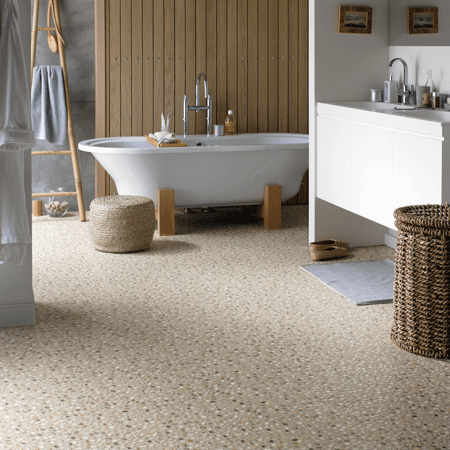
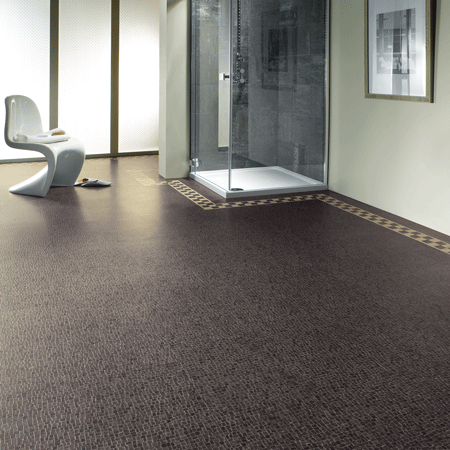
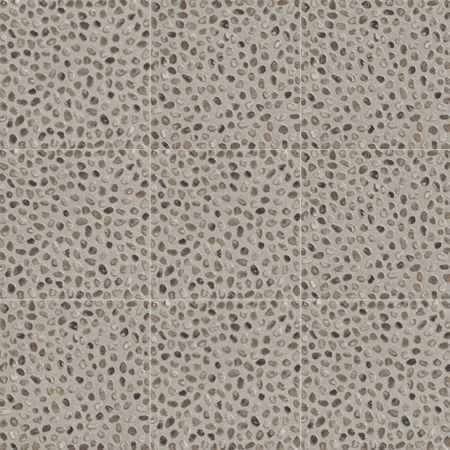
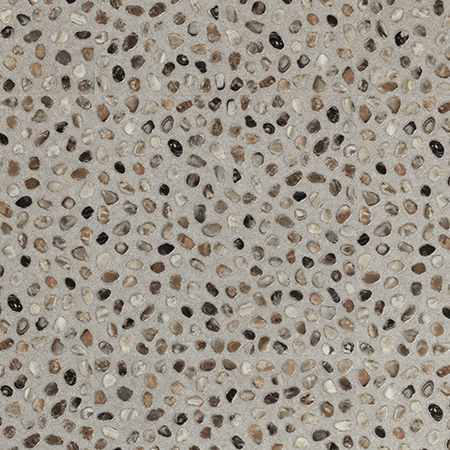
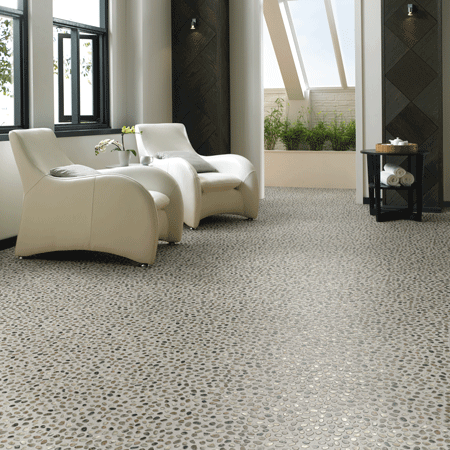
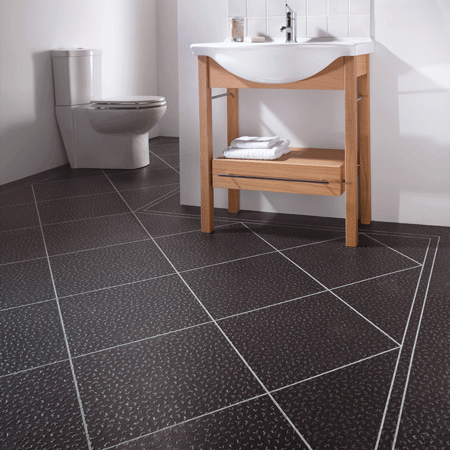
  • Bathroom flooring — American Olean Chloe from Home Depot
  • Bathroom decorative liner tiles — ebay

The post Robert and Caroline’s mid century home with dreamy St. Charles kitchen cabinets appeared first on Retro Renovation.


“The Hard Way Award” winners 2013 — Nanette & Jim’s blue bathroom… and Rebecca & Keith’s mid mod mad kitchen

$
0
0

retro renovation adYour votes are in: Congratulations to our “The Hard Way Award” winners for 2013: Above: Rebecca & Keith for their gut-remodel mid mod mad kitchen remodel….

vintage-bathroom-blue… and above: Nanette & Jim for their built-from-scratch-in-the-empty-basement blue bathroom. To be sure, both of these projects delivered beautiful results. And they exemplify the heart and soul of the blog: Their respective owners spent a lot of time getting to know their homes…. then doing careful research and planning to create spaces that suited the original architecture of their house. And like the name of this award, their projects did not come easy. Specifying and creating a period style bathroom or kitchen is a lot tougher than buying what’s fashionable today. Way to go, Rebecca, Keith, Nanette and Jim for showing us how doing things The Hard Way can pay off. Our other finalists also were wonderful caretakers of their mid century homes, and with their projects showed other fabulous ways to renovate and decorate our homes –>>

<h3>Mid-Century Modern Kitchen Remodels

We had four other finalists in the kitchen remodel category:

Mid-Century Modern Bathroom Remodels

We had two additional finalists in the bathroom category — be sure to check them out, they are full of ingenuity, tenacity and bang-for-the-buck, too:

Thank you, all, and thanks to everyone who voted!

The post “The Hard Way Award” winners 2013 — Nanette & Jim’s blue bathroom… and Rebecca & Keith’s mid mod mad kitchen appeared first on Retro Renovation.

Lori paints her tile backsplash, using a vintage McCoy vase as her color inspiration

$
0
0

“…From dour to fun” for less than $100

kitchen backsplash-before-and-afterloriReader Lori has been slowly making changes to her 1949 mid-century ranch house since she moved in about a year ago. She was featured in a Retro Design Dilemma asking for ideas for the window treatments in her living room last January. Now, she’s back to return the favor and share her secret for adding color to a tiled kitchen back splash — no hammer or chisel required. Taking her color cues from a treasured vintage McCoy vase, Lori inexpensively changed the color of black ceramic tiles using paint — with great success.

kitchen-beforeLori writes:

Hi Pam and Kate!

I’m a long time lurker, sometimes commenter and have even been a Design Dilemma (pinch pleat curtains)!

I thought maybe your readers would be interested in a cheap DIY that I recently did in my mid-century modern house. I painted our tile back splash from black to turquoise and copper in a random retro pattern. Totally changed the vibe in our kitchen from dour to fun and made our kitchen, which is not retro, fit in with the rest of our retro house. I’m not sure what I spent since I had many of the things I needed but it was under $100.

retro-tile-backsplash

mc coy vase

Lori took her color cues from a treasured McCoy vase

I’m planning on painting the walls. The current paint is what was there when we bought the house. Note the wood trimmed laminate counters. Even though my kitchen isn’t vintage that was one of the vintage laminate counter top edging treatments that was mentioned in one of your articles!

In the after the pendant light shades are made from glass telegraph insulators. They went with the turquoise tiles :-)

Wow, Lori — what a difference some color makes. Bravo to you for coming up with a solution to add some retro flair to your kitchen and “Love the House You’re In!”

How to paint over kitchen back splash tile:

The post Lori paints her tile backsplash, using a vintage McCoy vase as her color inspiration appeared first on Retro Renovation.

Five designs of metal rimmed kitchen sinks — howdy, hudee!

$
0
0

metal rim single bowl kitchen sinkSo exciting — the biggest discovery of the year, I am pretty sure, and it’s only February: Thanks to reader Sarah for prompting me to contact Ceco Sinks. This company manufacturers porcelain enamel on cast iron plumbing fixtures — and they offer FIVE designs of metal rimmed porcelain on cast iron kitchen sinks — in both single- and double-bowl styles.

This is big news for Retro Renovators who, previously, thought they were limited to Kohler’s single design selection. Above: Seaside single bowl, metal-rim kitchen sink – porcelain enamel on cast iron, from Ceco sinks. Continue reading to see the other four designs! 

metal-rim-kitchen-sink-double-bowl
Above: San Clemente metal-rim, double bowl kitchen sink.

retro kitchen sink metal ringAbove: Zuma high-lo hudee ring kitchen sink

Note: The three designs above — all with integral ledges with holes drilled to hold a faucet — are probably the best choices for Retro Renovator doing a period style kitchen from the 1950s on.

That said, if you have an earlier kitchen, putting a hudee rimmed porcelain sink under a wall-mount faucet also would be appropriate. Yay, Ceco also has some sinks to work in this configuration:

metal rim kitchen sink
Above: Little Corona — Several model numbers shown, check with Ceco to understand which to choose for your use.

hudee rim sinkAbove: The #732 (no name) can be installed with a hudee ring, the company told me.

hudee ring sinkAbove: And the #732 (no name) also can take a hudee.

Where to buy a Ceco sink

Ceco Sinks does not sell directly to the public — they are a wholesaler. To order one of their sinks, try a local plumbing supply store (not a big box store, though) to see if they can order the sink for you. If you have any trouble, call the company, and they can direct you to the nearest regional distributor.

The company tells me their prices are competitive with — maybe even 10-15% less than –Kohler, as one example. However, depending on how close you are to a distributor, shipping charges may be required, which would affect the total price.

The sinks come in six neutral colors — white, biscuit, almond, bone, platinum (similar to Kohler’s ice grey) and black.

The post Five designs of metal rimmed kitchen sinks — howdy, hudee! appeared first on Retro Renovation.

Replacing the movement and hands on a vintage electric wall clock — 3 steps

$
0
0

vintage-westclox-new-movementWe’ve all come across a great looking vintage clock that would be perfect — except for the fact that it no longer tells time. When this happens we have two choices: Use the stopped clock as wall decor or try to bring it back to life by replacing the movement. After having come across just such a clock myself, I decided to take a shot at repairing it myself. While I’m no expert at DIY clock repair, in the end I did manage to get my vintage clock working again even with a few hiccups along the way. What follows is my own experience replacing the movement in a retro wall clock — in three somewhat easy steps.

vintage-westclox-no-cord
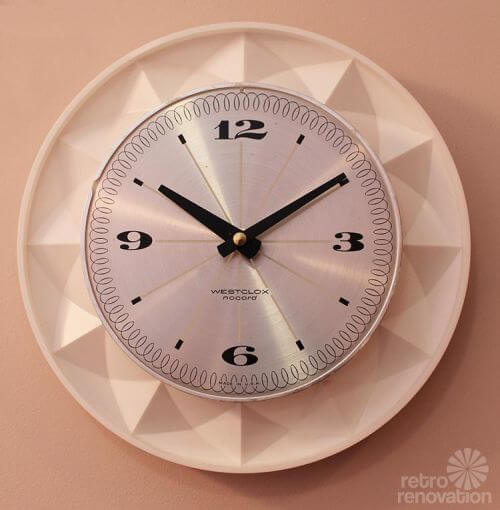
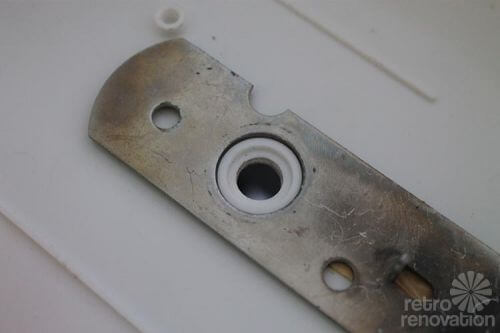
My journey into clock repair all started during my retro pink bathroom renovation project, when I purchased a vintage Westclox “nocord” from eBay to hang in my bathroom.

I bought the clock because I liked the interesting geometric white plastic edges and the fun retro swirly and starburst designs on the face of the clock. (Oops, I do not have a photo of the “before” clock.) The clock was inexpensive, and the seller said that it “worked great”, which made me think I’d only need to slap it on the wall and call it a job well done. Once I received the clock, though, I verified that it did work — though unfortunately it gained about five minutes every day, which add up fast over the course of a week.

Determined to replace the movement, I started doing research and found that it should be a relatively easy task assuming:

  • You can easily remove the old movement…
  • And, you can determine exactly which replacement movement is needed.

Unfortunately for me, both of these tasks proved difficult. As an added challenge, I wanted to reuse the original George Nelson-style clock hands — which I knew in advance might not be possible — or, to find replacement hands as close as possible to the originals.

Step 1 — Carefully remove the old hands and movement

repairing-a-vintage-clockAfter researching “clock movement replacement” on the web, I found that the first step was to remove the old movement. In most of what I read and saw on YouTube, the nut that holds the hands on the clock face should either pop off easily with a light, upward tug or unscrew from the clock hand shaft. First I tried unscrewing the nut, which got me nowhere because the mechanism turned as I tried to “unscrew” the nut. Next I tried to tug on the nut gently in an upwards motion. Still the cap nut would not budge. Getting frustrated, I held the “pull to start” knob on the back of the clock to hold the movement in place so it wouldn’t turn, then tried a combined unscrewing and pulling motion with the pliers.

original-clock-hands

Alas, I could not use these original hands — including the cool “George Nelson” style hour hand — with the new movement. Read on…

After several attempts using this method, the clock finally let go of the cap nut, which was (interestingly) connected to the minute hand. From that point the hour hand popped off easily. Then, carefully using the pliers, I was able to unscrew the hex nut from the clock face, which freed the movement from the clock body.

Step 2 — Measure the old clock movement and find a suitable replacement

hand-shaft-measurementThe next step is measuring the old clock movement to determine the size you’ll need when you look for a replacement. The most important part to measure is the overall measurement of the hand shaft — the part that goes through the clock face and holds the hands onto the clock. You’ll need to take into account the thickness of the clock face as well, to make sure the hand shaft will protrude far enough to be tightened to the clock face with a hex nut. There are many places to buy replacement clock parts online — I ordered my movement from Klockit

push-on-clock-movement

First movement I ordered — a Quartex push-on movement with hex nut #10051 — ended up being too short for my clock.

Once again, what should have been an easy task did not go according to plan. On my first attempt, I measured my hand shaft and ordered a Quartex push-on movement with hex nut with the same length hand shaft as my original movement. Unfortunately, the movement wouldn’t work in my clock. Why? First, the threaded portion of the hand shaft was not as tall as the threaded portion on the original movement.

clock-hanger-holeSecond, because of the plastic ridge around the new movement’s hand shaft — (the original movement was flat) — and the ridge on the back of the clock face, the hand shaft would not go far enough through the clock face to be tightened with a hex nut. Bummer. Feeling frustrated, I contacted Klockit for guidance. They replied quickly, saying I was on the right track, but just needed to order a movement with a longer hand shaft, and suggested I try their Q-80 clock movements instead of the push-on movement I first ordered.

quartex-clock-movement

Q-80 Quartex clock movement from Klockit. I ordered part #10152 for my vintage clock.

Thinking I’d give it one more shot before throwing in the towel, I ordered a Q-80 clock movement with a slightly longer hand shaft. It was apparent to me at this point that I would not be able to use the original clock hands since the holes in the original hands were much smaller than the diameter of the new movement shaft. Since Klockit offers a free set of hands with each movement they sell, I tried to find the hands that most closely resembled the originals.

retro-clock-faceOf course none of the options had a large pink arrow on the hour hand like the retro originals, but I did find a set where the minute hand was nearly identical to the original minute hand. When choosing new hands, you’ll also want to make sure the length of the new hands is as close to the length of the original hands as possible to avoid using hands that are too short or too long for the face of the clock.

Step 3 — Reassemble your clock

clock-movement-replacementFor me, reassembling the clock — once I had the proper replacement movement — was the easiest part of the whole process. All I needed to do was follow the directions that came with the movement. I made the quick sketch above to help illustrate the process.

  1. Use rubber spacer gasket between movement and dial to hold movement in position without having to over tighten it.
  2. Place a brass washer between the dial and the hex nut to prevent the nut from marring the dial as you tighten it down.
  3. Tighten the nut down only enough to hold the movement firmly in position. If the movement can rotate in your clock case, timekeeping will be affected.
  4. Temporarily place the minute hand over the “I” shaft as illustrated and rotate the hand clock-wise until it is pointing at the “12″ on the dial. Lift the hand off.
  5. Choose any number on your dial to align the hour hand with. Very carefully press the hour hand straight down onto the tapered, friction-fit hour shaft until the hand is firmly in place. In the event that the hour hand is not perfectly aligned with the number on the dial that you have chosen, DO NOT try to rotate the hand hub on the tapered shaft. Lift the hand straight off. Realign the tip of the hand with the number and press the hand on correctly.
  6. When you have the hour hand mounted, carefully remount the minute hand at 12:00. While holding the tip of the minute hand between your thumb and forefinger at the 12:00 position, thread on the closed nut.

retro-clock-new-movementAfter popping in a battery and setting the clock to the correct time, it was all systems go. I’m happy to report that the clock has been keeping perfect time since I replaced the mechanism over a week ago.

What I learned — helpful tips:

  • As much as you will want to keep the clock’s original hands, it may not be possible. I was lucky to find a new minute hand that was nearly identical to the original minute hand. It may be possible for me to somehow make the hole in the clock’s original hour hand large enough to work with the new hand shaft on the movement, but I have not tried drilling or punching the hole to attempt to make it larger. Anyone with clock fixing experience want to verify if this is possible?
  • All of the nuts and washers on my original clock were silver. It seems that new nuts and washers only come in brass. I was able to use the original hex nut, but for the closed nut that holds the hands in place, I could not reuse the original. The brass nut doesn’t bother me, but it could easily be spray painted silver to match.
  • The hardest part of the whole project was trying to determine exactly which replacement movement would work with my clock. The movements were not expensive ($3-$5), but I did have to order two different movements before finding one that worked with my clock. It may be worth ordering two movements with slightly different hand shaft measurements to ensure that you get a movement that will work with your clock on the first try to avoid extra shipping charges.
  • If you have a clock repair store near you, I would take the old clock and movement in to the store and ask for professional help in selecting a replacement movement. Figuring that part out myself was a headache!

vintage-clock-bathroom
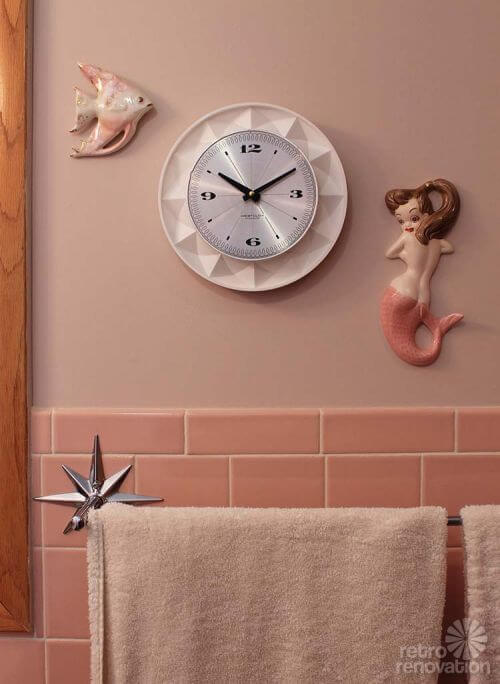
Even after all of the trials and tribulations, I’m still glad that I went to the trouble of replacing the movement on my vintage clock. The clock looks perfect in my retro pink bathroom, flanked by some vintage fish and mermaid ceramic wall plaques, and has so much more character than a new clock would have.

vintage-pink-bathroomNow I can check the time from inside the shower — to make sure this so-not-a-morning person is not running too late.

The post Replacing the movement and hands on a vintage electric wall clock — 3 steps appeared first on Retro Renovation.

Never used! A 1960s harvest gold kitchen for sale in Worcester, Mass.

$
0
0

harvest-gold-kitchen--2harvest gold kitchenWhen I announced that Harvest Gold was Retro Renovation’s 2014 Color of the Year, I asked readers to be on the lookout for harvest gold kitchens for our archive. I’ve received many emails — thanks, all! — but this one is particularly notable: Robin spotted a virtually unused harvest gold kitchen — complete with cabinets and all appliances — including a harvest gold refrigerator and dishwasher — for sale at the ReStore in Worcester, Mass.
.

I do not believe this kitchen is from 1963, as advertised. We did not see gold colors like this on kitchen appliances until 1968. And this one — with the shadowing around the edges: I’ll guess a few years later. In any case — what a fun find! 

Robin wrote:

Hi Pam,

You said you were looking for some harvest gold appliances? I live in Worcester, MA, and I’ve taken some awesome photos of a complete and UNUSED harvest gold kitchen from 1963 that our Restore in Worcester has for sale. It’s a full suite of harvest gold wooden kitchen cabinets, harvest gold GE fridge and Kitchen Aid dishwasher. A chrome Westinghouse wall oven and cook top with NuTone range hood, stainless steel sink, and a brown/pink Wilsonart boomerang countertop and back splash with metal trim for the whole thing. They even have the original fluorescent ceiling fixture/light. The kitchen came out of a house in Worcester, and the Restore folks said it was a second kitchen in a finished basement that the owners had never used. They even have the manuals for the appliances! It photographs beautifully because it’s not in pieces… they have it all staged as a room (IKEA style, if you’ve ever been). They even have a little 70′s era kitchen table and fondue set in front of it, and a teapot on the stove! Super cute.

Thanks for your blog!

-Robin

harvest-gold-kitchen--12
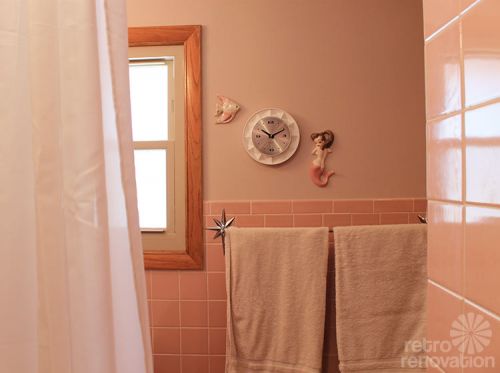
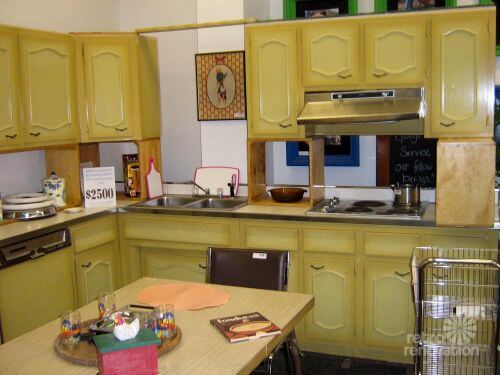
Thank you, Robin! It is so great to see the Worcester ReStore celebrating this kitchen for what it is — having fun and playing it up, rather than apologizing for it.

harvest-gold-kitchen--7Above: Interesting that the boomerang laminate countertop does not seem to have any gold or even avocado in it. I wonder — if this was for a basement kitchen — if the homeowners just chose “what they liked” rather than trying to be matchy matchy decorator-like.

harvest-gold-kitchen--3From what I *think* I now about old refrigerators, the one above likely is an energy hog. The key to high energy usage on old fridges: Does the freezer have automatic defrosting? If so, that’s what uses so much energy — the freezer compressor is turning off and on all the time to repeatedly defrost. Old refrigerator-freezers that DO NOT have automatic defrost may not use excessive energy. The only true test: Put it on a meter; don’t assume.

harvest-gold-kitchen--4Stainless steel wall oven. Yes: We do see stainless steel used on vintage appliances including all the way back to the 1950s.

harvest-gold-kitchen--5These old dishwashers were absolute WORK HORSES!

harvest-gold-kitchen--6harvest-gold-kitchen--8

Above: Sexy controls, even.

harvest-gold-kitchen--9Above: A classic “Circline” ceiling fixture. Throws a lotta light, I bet!

harvest-gold-kitchen--11

harvest-gold-kitchen--13

Thank you, Robin. I live only an hour and a half from Worcester. If I were a decorator with a warehouse, I’d drive on over and snap these up for sure for a future project. However, I’d probably try to deal re: price. It’s hard to fit someone else’s kitchen into yours… the refrigerator likely uses a lot of energy… and despite my adoration of vintage colors, it’s going to take a special buyer to understand and embrace this kitchen.

Slide show of harvest gold kitchen

To use slide show, click on any image, use arrows below the photo to move forward to back. You may stop or start at any image:

The post Never used! A 1960s harvest gold kitchen for sale in Worcester, Mass. appeared first on Retro Renovation.

Would you buy a smartphone case — for your refrigerator and dishwasher? GE Artistry series explores this option

$
0
0

Breaking News + VOTE: GE considers colorful, replaceable panels for its newest appliance series

GE-colorful-appliance-skinsWould you buy colorful, replaceable steel panels — a “smartphone case” — for your GE Artistry Series refrigerator and dishwasher? Well, more Breaking News here on this recently-introduced appliance line: We have now learned that GE is exploring offering iPhone-style skins to fit over the fridge and dishwasher — and the company has mocked up five potential colorways to elicit marketplace feedback.  Read more below — then take our vote — would you go for appliances with with color panels like this, and if so, what color would you want?


GE-Artistry-retro-appliances-e1372437598874

Click the photo for our original story about GE Artistry series appliances.

As you may recall, we were first on the web with news about GE’s retro styled Artistry appliances early last summer — and since then we’ve heard from many readers who have purchased appliances from the line for their vintage kitchen remodels. The colors currently offered are a classic white — our favorite, and black.

Now,  Lou Lenzi, Director of Industrial Design for GE Appliances has quietly (it seems) published a tumblr post indicating that GE has “been kicking around the idea of adding color to Artistry’s current glossy black and white finishes.” They also mocked up possible colors and finishes to gauge for market reaction.

We quickly asked some additional questions:

How serious is GE about this, really?

GE: We’re serious. We have had so many expressions of interest in colors that we need to quantify if this makes sense, and that’s the purpose of this outreach.

How much would such a skin cost?

GE: Our goal is a $100 adder over white or black.

Can you further share: What would the material would be made of? Obviously, some dishwashers and fridges (e.g. Sub-Zero) already are designed to take panels. … ?

GE: We are considering high-gloss, powder-coated paint on cold rolled steel with anti-corrosion protection.

We love this idea. But then we are color lovers here.

red-refrigerator-retro

From the blog of Lou Lenzi, Director of Industrial Design for GE Appliances:

Artistry Color Exploration

The Design team here at GE Appliances is constantly looking at trends – “from culture to cooking” as we say, generating insights about the world we live in. These insights inform and guide us towards designs that make lives easier, more enjoyable and maybe a little more entertaining too.

yellow-retro-style-refrigerator
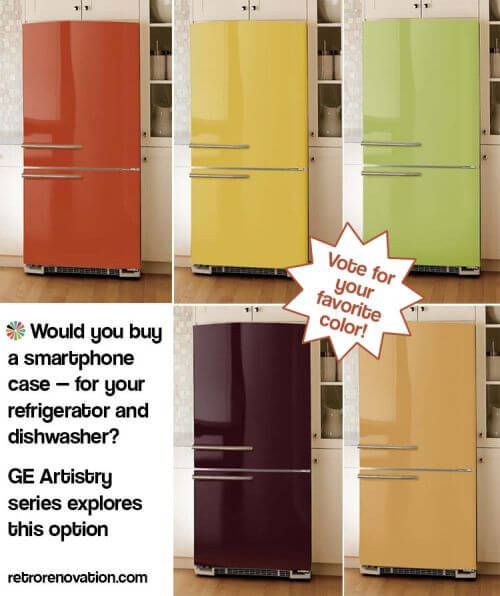
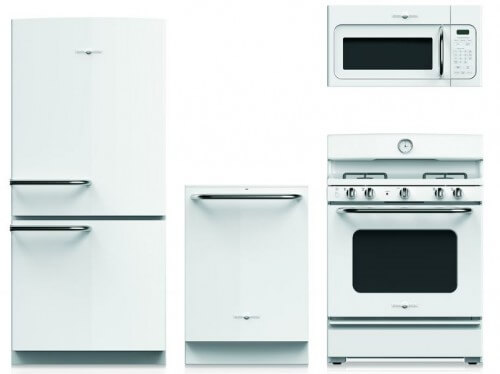
It’s a pretty dynamic activity. Every new generation of homeowner drives new trends, demanding change, just as the newest generation, dubbed “Millennials,” were the catalyst for our new Artistry line of kitchen appliances.

eggplant-kitchen-appliancesWhile Artistry only entered the market last fall, we’ve been kicking around the idea of adding color to Artistry’s current glossy black and white finishes.

lime-green-retro-colorful-kitchen-appliancesBefore we fall into the trap of creating (and being blamed for) the next Harvest Gold, we thought we’d start with colors that might already be present in your kitchen – ginger, lime, cinnamon, aubergine (aka eggplant for the uninitiated), and lemon. Next, we considered a variety of finish scenarios. We started by bathing the entire appliance suite in color, then tried selected appliances as accent pieces within the suite, and finally landed on colored “skins” that could attach to the front of the refrigerator and/or dishwasher, which could be changed or swapped out for new colors, much like a smartphone case.

Scroll through our images to experience color in context. Notice how a light or dark surrounding environment can transform the feel and mood of a color or kitchen. What do you think?

jonathan adler colors targetOur take on the proposed GE Colors

Some of the colors GE is considering for their appliance skins seem to be channeling the Jonathan Adler line of kitchen and bath sinks from Kohler – bright and cheery, retro-mod.

red-vintage-style-refridgerator
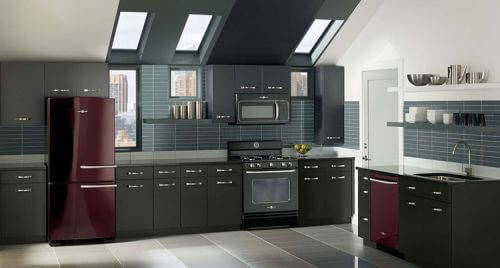
My personal favorite among the proposed GE colors is their Cinnamon, above. This shade of orange-red might work in a variety of vintage kitchen styles from the 40s to the 60s.

Yellow-kitchen-appliancesThe lemon color GE is considering is not quite right for a 40s or 50s vintage kitchen, but would look totally groovy in a retro mod, flower power late 60s or 70s kitchen, don’t you think?

lime-green-vintage-style-refrigeratorThe same can be said about the lime offering — though it doesn’t seem to be quite as acidic as a true retro lime, it would still blend nicely into a colorful mod kitchen.

cinamon-colorful-refridgeratorWe are amused that GE’s blog post dismisses Harvest Gold (Retro Renovation 2014 Color of the Year – because their “Ginger” reminds us oh-so-much of that same lovely shade. We like this one a lot! This would be a nice choice for anyone trying to recreate a 1960s through 1980s kitchen.

vintage-styled-purple-appliancesOf all of the proposed colors, GE’s Aubergine, above, may be the most problematic — because when it comes to purple, many people either love it or h*** it.  Even so — at $100 per panel, it doesn’t sound like too big a risk.

Inspiration from 1968: Wacky-awesome!:

Go, GE, Go!

If GE moves ahead with this idea, we’d sure love to see them give a nod to the retro with several of their color offerings, of course! No matter what, though, we are super excited that color is returning to the appliance market once again. RESIST THE GREIGE NATION, America!

Readers — What do you think about the new GE Artistry appliance skins? Which colors would you like to see offered?

The post Would you buy a smartphone case — for your refrigerator and dishwasher? GE Artistry series explores this option appeared first on Retro Renovation.

My vintage Republic Steel Kitchen cabinets salesman’s at-home presentation kit — includes rare Easel Presentation — 24 photos

$
0
0

salesman-sample-kit-3Back in the day, the salesman selling steel kitchen cabinets would actually come to your house. He would carry with him a briefcase. Inside: An entire kit full of little kitchen cabinets that could be assembled to create the kitchen of Mrs. America’s dreams. In the very early days of my research to recreate my vintage kitchen, I scored a Republic Steel Kitchen salesman’s kit on ebay — and it’s extra special, because it includes the large, full-color, spiral bound ‘easel brochure’ — 34 pages! — too. I can’t believe I never showed this wonderful steel kitchen cabinet salesman’s kit on the blog before — it’s fantastic!

salesman-sample-kit-19vintage salesman sample kitchen plannersalesman-sample-kit-2-3Above: This salesman’s sample and selling kit must have cost Republic Kitchens a fortune to produce. Inside the kit, all the little cabinets.  There is a refrigerator… a range… several sink bases in different sizes… doors…. windows… base cabinets… wall cabinets…. and corner cubbies, both wall and base. “My salesman” magic-markered where each cabinet should go. My kit appears to be quite complete.

vintage kitchen planner steThe idea: Mrs. America would come into the kitchen store and talk to the salesman there… Then, he would follow up with a visit to her home, where the deal would progress in stages.

salesman-sample-kit-4-3salesman-sample-kit-1-3Above: The back of each Republic ‘cabinet’  is marked with its size. Each little piece corresponds with an actual cabinet that you could order. Note, ironicallyish, the leetle cabinets are made of plastic, not steel.

salesman-sample-kit-3-3Above: There is a measuring tape that came with the kit. As part of the at-home selling process, the salesman would measure the homeowner’s kitchen so that with them, he could mock up their dream kitchen using the pieces in the kit.

salesman-sample-kit-2salesman-sample-kit-11

pam kueber with republic kitchen cabinet set

In the way early days of the blog, I wrote a story about vintage steel cabinets for Old House Interiors magazine. This was the photo taken to go-with. :)

Above: A quickie kitchen design I made for this photo shoot… I actually used this set to help design my own kitchen and imagine how it would flow. At various times when I’ve had people … reporters, photographers … come to the house to see the kitchen, I also would set this Republic set up — and they were just as fascinated with it as with my actual kitchen!

salesman-sample-kit-4salesman-sample-kit-5 salesman-sample-kit-6 steel kitchen cabinets salesmans kit salesman-sample-kit-8 salesman-sample-kit-9 salesman-sample-kit-10Above: The big salesman’s presentation is fantastic — chock full of amazing images to entice Mrs. Homeowner into buying.

salesman-sample-kit-6-3Above: There were five designs of Formica in the kit. I presume that Republic wanted to sell you the counter top, too. According to Grace Jeffers‘ master’s degree thesis, this pattern — Moonglo — was introduced on Sept. 27, 1948 at the Third National Plastics Exposition in New York city. It was conceived by designer Morris Sanders before World War II, but not brought to market until after. It was available in six colors — gray, tan, yellow, fiesta (the red you see above) and blue. Grace says that the pattern remained in the Formica collection until the later half of the 1950s. She says that the pattern mimics fiberglass, a popular leitmotif of the postwar era. I love that word — “leitmotif”. I need to use it more often!

salesman-sample-kit-12In the kit I purchased, there were four pieces of Formica. The other was a gray Mother of Pearl — a super popular pattern. The kit instructions say it came with five Formica samples. I do not know what the fifth would have been — I will guess, one more color of either of these two designs, likely that Republic would feature the most popular palettes.

salesman-sample-kit-13 salesman-sample-kit-14 salesman-sample-kit-15
salesman-sample-kit-20Above: At the very end of the presentation deck, there is a special section just for the salesman to read. It instructs him exactly how to conduct the in-house sales meeting… how to use the kit… and how to complete the follow-up driving toward the sale. My favorite little tidbit:

1. You dissatisfy your prospect with her present kitchen … by showing her examples of efficient, beautiful kitchens and problem-solving ideas…

Tee hee. American marketeers haven’t changed a bit. Except that instead of buying new kitchen cabinets made today…. I’m buying salesman sample kits. This is actually just one of four in my collection. I also own a set like this for Youngstown Steel kitchen cabinets — no big color presentation brochure, though. I own a much less complex “Plan your kitchen kit” that was sold or given away by Con Edison. And, one of my favorite finds is an old wood-block set of Curtis Kitchen cabinet models.

These days, there are usually one or two of these kits (various manufacturers) on ebay. They have become pretty expensive — $250 for a kit seems to be a going rate. However, most kits do not have the easel presentation, at least whenever I check the status of current auction inventory. *Nananananana dance.* I hope you enjoyed this one!

Slide show — Large photos of my Republic Steel kitchen cabinets salesman’s kit:

The post My vintage Republic Steel Kitchen cabinets salesman’s at-home presentation kit — includes rare Easel Presentation — 24 photos appeared first on Retro Renovation.


Formica 6696-46 Carrara Bianco marble — my new top-favorite marble laminate

$
0
0

formica-carrara-marble-laminateFormica last month introduced a new Carrara marble laminate — Formica Carrara Bianco 6696-46. Previously, I had identified three places you can find Carrara-style laminate. This Formica design now makes four. Moreover, because of its available #46 etched surface — which mimics fleabite pits you likely would see in the patina of real, aged marble — it now my favorite choice among the Carrara marble laminates on the market today. I asked Formica to send me a large sample, which they did — and I really like the fleabite etching. It looks and feels great — gives the laminate a very natural look. 

Cararra-Bianco-laminate-FormicaI do not know when a marble laminate like this was first introduced to the market. But I do know that most early laminates were designed to mimic other materials — like linoleum. And, by 1969 I know we had Formica White Onyx — which is still available today. Formica’s White Onyx is the oldest pattern in Formica’s range (there are some solid colors that are older, though).

That said, I associate Carrara marble with pre-war kitchens — not post-war kitchens. Doing a 1900s-1930 farmhousy kitchen? Go for it!

For bathrooms, I would probably consider Carrara marble for both pre- and post-war bathrooms, though. I think it would be “okay” in a postwar bathroom because that’s a smaller space.

If I liked the marble look, I would actually prefer a marble laminate in my house — because (1) it would be way cheaper to use laminate than marble… (2) marble is notoriously porous and stains easily, and 3) I don’t like the idea of the environmental degradation caused by mining when laminate would work just as well on a counter top installation, maybe better. When I worked in the sustainability field for a while, I learned the concept of “Material Utilization.” I *think* I learned that, at its heart, sustainable material utilization means using resources — especially finite resources — toward their highest possible cause. I don’t have the data, but my hypothesis is that: Mining marble and granite to use as kitchen and bathroom counter tops is not the best possible use of those finite materials and the energy to process them, when alternatives like 70% paper counter tops (laminate) can do the trick and at a fraction of the cost. Simple ceramic tile also would be wise material utilization for this purpose, I think.

Note: I checked with two of other companies making Carrara marble laminates — neither Wilsonart nor Abet Laminati offer etching like this on their Carrara laminates. I did not check with Arpa; their website is difficult to navigate.

If I were using marble-patternd laminate for a counter top, I would consider doing the fancy post-formed edge that eliminates the visible Kraft paper line. Instead — and especially now that there is this etched Formica Carrara Bianco — I would probably go for it and try to mimic real marble as best I could. This preference is actually counter to the way I’d use other laminates — with other patterns or solids, I’d likely either have a flat edge with the Kraft paper line… or, I’d do a classic postformed edge — just a simple roll… or, I’d edge in steel or aluminum; that is, I would not try to disguise that I was using laminate. With the Carrara marble laminate, however, I just like the idea of faking it, which is possible with postforming technology — not to mention the pitted Formica #46 etching — today.

One final note: Carrara marble — with its closer veining — is the timeless one. The Calacatta marble you see featured in mainstream media a lot today was not commonly used back in the day, as far as I know; it’s a trendy fashionable thing circa 2013. If you want to create a Retro Renovation style kitchen or bathroom, ix-nay the Calacatta, go for the Carrara.

formica finishes

The post Formica 6696-46 Carrara Bianco marble — my new top-favorite marble laminate appeared first on Retro Renovation.

Two affordable retro kitchen sinks — $100 or less

$
0
0

bootz-retro-hudee-rim-kitchen-sinkYesterday we learned that Bootz Industries makes two models of porcelain on steel, retro style hudee rim bathroom sinks. Wouldn’t you know it — they make two styles of metal rim sinks for the kitchen, too — both a single and double bowl variety that can be easily and inexpensively ordered through HD Supply.

Reader Tappan Trailer Tami is tipped us off to the availability of these kitchen sinks. She writes:

bootz-retro-hudee-rim-kitchen-sinkBootz Garnet double bowl, 4 hole kitchen sink price through HD Supply $69.29. Note: this is for the 4 hole sink, guess you’d have to call HD to see if they can also get the 3, or 5 hole versions. Hudee ring for this sink through HD Supply $34.39. Total cost with ring $103.68. [Editor's note -- yes, HD Supply has excellent customer service, in our experience. Call them if you need more information, you should set up an online account first, they say -- this will make talking to the Special Orders department go faster.]

bootz-kitchen-sink-retroBootz Topaz single bowl kitchen sink through HD Supply $57.95, hudee ring for single bowl kitchen sink through HD Supply $28.85. Total cost with ring $86.80. Note: this is for the 4 hole sink, guess you’d have to call HD to see if they can also get the 3, or 5 hole versions. [Editor's note -- yes, HD Supply has excellent customer service, in our experience. Call them if you need more information, you should set up an online account first, they say -- this will make talking to the Special Orders department go faster.]

Thank you, T3, you rock!

We believe that porcelain over steel is a period-correct choice for both bathroom and kitchen sinks. Pam says that in her 1951 house, the original Briggs tubs were enameled steel, and so were the hudee-rimmed bathroom sinks, she thinks. Here’s what Bootz Industries has to say about its kitchen sinks:

Dual Purpose Undermount or Self-Rimming Application

  • The extra space combined with classic styling makes kitchen chores a breeze.
  • Mounting rim not included.
  • To be used in an undermount or self-rimming installation.
  • Available in 4-hole faucet punch. 3 or 5-hole available upon request.

BOOTZ PORCELAIN ON STEEL KITCHEN SINKS
The Bootz Garnet double-bowl sink has a durable porcelain surface that is easy to clean and maintain. Porcelain on steel sinks have a non-porous glass surface that resists scratching, chemicals, heat and bacteria growth. Bootz kitchen sinks remain “timeless” in design and installation. Consumer preference continues to grow for “porcelain on steel” fixtures installed with ceramic tile.

  • Totally inorganic and environmentally friendly – nontoxic, mineral substance
  • Fade proof – colorfast (color is in it, not on it)
  • Sanitary – a nonporous surface that resists bacteria growth and cleans easily
  • Flame proof – will not burn
  • Abrasion resistant – will not scratch from wear and cleaning
  • Chemical resistant – resistant to harsh chemicals
  • Corrosion resistant – will not rust

Three manufacturers of metal-rimmed kitchen sinks:

This brings our total count of available hudee rim kitchen sink sources to three including:

The post Two affordable retro kitchen sinks — $100 or less appeared first on Retro Renovation.

A family rebuilds and restores a 1953 kitchen to its former glory

$
0
0

midcentury-retro-kitchen-wood-cabinets

luke-and-mom-300

Luke and his mom Joyce (his dad Robert was behind the camera).

Reader Luke’s parents’ admired the 1953 ranch home next door to their house for 18 years, and the day it came up for sale, and they decided to make it their own. The home had fallen into disrepair over the years and would need lots of TLC, so with help from their son Luke – and grandma too – the family began their group restoration effort with kitchen. Instead of gutting the damaged original cabinets and replacing them with something contemporary, Luke and his father lovingly repaired the original cabinets, saving as much material as they could. The results are beautiful.

vintage-kitchen-retroLuke writes:

I have read your blog for about two years now, and I became rather interested in retro remodeling when I started helping my parents fix up their new-old house. My parents purchased a 1953 Ranch Home in Oklahoma about two years ago. The house they purchased was in a disastrous state… [including having been] flooded about three times in its life from a nearby creek. My parents had lived next door to the house for 18 years and decided to purchase the house when it became available. The house was larger and also was situated on a double sized lot which my parents liked. Looking at the photographs of the home when they first purchased it, I wonder why we were all drawn to the home. After repairing, fixing, and cleaning everything in the house it now is a happy home.

cabinets-before

Before: The cabinets had suffered severe water damage….

When my parents first purchased the home, we were all unsure what would be done about the kitchen.  The original wood cabinets in this kitchen were so old and not very well cared for that we had thought about gutting the entire kitchen and putting contemporary cabinetry in its place. However, we did not do that, and I am very glad that wasn’t done. I believe new cabinets would have ruined the character of the home.

We had also talked about just refurbishing the cabinets on one side of the kitchen where the fridge and stove sit.  After rebuilding those cabinets we realized that the whole kitchen really needed to be fixed.  Most of the cabinetry has new doors and new facing around the doors. (The only section of cabinetry that is 100% original is the section above the sink.  By the time we finished the other cabinets, we were really sick of all of it, so the cabinets above the sink were left and refinished.  They were actually in the best shape compared to the rest of the kitchen.)

My father and I removed all the old birch plywood facing, put new birch hardwood facing on, constructed new birch plywood doors, edited the layout of the kitchen a bit, and ended up with what I believe to be a pretty wonderful result.

kitchen-before-remodel

Before: Adorable oven, but quite small…

By peeling back of these old layers, we were really able to see what the original kitchen would have looked like.  The flooring was a white vinyl tile with red, yellow, and blue splotches.  The tile seemed like it would have coordinated well with the dark blue countertop.  The countertop also had metal trim with a grey rubber insert. The original kitchen had an electric cooktop and a beige electric wall oven, the oven was actually still in place when my parents purchased the house along with the copper colored Vent-a-hood. We might have repaired the oven, but it was so small you could hardly fit a normal sized cookie sheet in it. It sits in our storage shed; we don’t quite know what we could do with it. We also had a good reason to believe that the original kitchen was equipped with a dishwasher which would have been quite a luxury item.  We also removed three or four layers of wallpaper off the walls, all of them were beautiful vintage patterns.

midcentury-kitchen

Before: Structure of the cabinets in good shape.. but it was time for new doors.

The pictures I am sending are of the original kitchen, a few construction pictures, and the final product.  The pictures of the old kitchen are from before we purchased the house and people were setting up for an estate sale. I unfortunately never took photos of the kitchen after it was emptied out. They really don’t show the extremely dilapidated state of the kitchen.  At one time there was about 20 inches of floodwater through the entire house.  All of the lower cabinets were peeling and splitting apart. The cabinets near the stove were coated in grease and it looked like there had been a fire in that area at one time.

Cabinet-ConstructionWhen we rebuilt the cabinets we took out the area for the wall oven and cooktop and put a normal slide in range in its place.  We also brought the fridge out of the corner because the doors on the fridge would not fully open when the fridge was up against the other wall. That was the largest change to the layout.  The rest of the kitchen stayed pretty much the same.  The construction photos show how we rebuilt our cabinets.  We removed the old exterior of the cabinets, we pretty much saved everything on the interior because it wasn’t in too bad of shape, and then we replaced it with new birch hardwood and plywood.

mid-century-kitchen-cabinets

Luke and family moved the refrigerator from its previous position, which abutted the wall, so that the doors could open fully.

On the finished kitchen my parents thought about going with the new GE artistry appliances, but they didn’t offer those appliances with features such as a water dispenser in the fridge door and a self-cleaning oven option.  If my mother had the option she would have picked turquoise appliances, but it seems that stainless is really the only thing on the market anymore.

copper-light-fixture-midcenturymidcentury-ceiling-light-fixturevintage-cafe-curtains The countertops I think were called Sea Glass, and I think they came from Wilsonart. It kind of has a muted pattern on it, but it adds a nice pop of color and keeps the kitchen from being so incredibly stark with all of the stainless steel. We stained the new portions of the cabinets to blend with the older portions and I think we did a fairly decent job matching the new and old. The paint was from Sherwin Williams and the color is 7692 Cupola Yellow.

1950s-cafe-curtains

We love LoVe LOVE the cafe curtains made by grandma!

Finding window treatments for the kitchen was also a challenge.  My mother wanted something that wouldn’t hide the look of the windows and something that could easily be moved out of the way.  My mother thought about using woven wood shades or something similar, but she found the post on your blog about café curtains, and she went with the pattern that seems to resemble a keyhole pattern.  My mother picked the fabric and my grandmother created what you see in the pictures.

retro-blue-bathroom-tile vintage-pink-tile-bathroomWe would love to share more of the house with you and the Retro Renovators, but my parents are still in the process of moving and getting everything arranged. I am also going include two pictures of our two preserved vintage bathrooms, which we had professionally cleaned and grouted.

Your blog has not only been helpful in our remodeling and fixing of my parents’ house but also thoroughly enjoyable to read.

Luke, you and your dad did an excellent job repairing the original cabinets. Kudos to you for taking the time to think about what the house needed instead of just gutting the space and starting over. I love that this project was a family affair, that everyone pulled together — even granny — to help which makes the finished space that much more wonderful. Thanks so much for sharing your story with us.

The post A family rebuilds and restores a 1953 kitchen to its former glory appeared first on Retro Renovation.

Simply adorable — vintage miniature steel kitchen cabinets made by GE

$
0
0

replica GE steel children's kitchen playsetWhat’s more delightful than a pile of puppies? This adorable GE Little Miss Structo children’s steel kitchen cabinet set — quite possibly the cutest vintage kitchen I’ve ever seen – spotted by reader Chicago Char on the Chicago craigslist. This pretty pink play set packs a lot of features into a teeny tiny frame – three drawers, a lazy susan, a sink, plenty of cabinet space and even four sliding door upper cabinets. As a kid, I would have died for a play kitchen this cool — ok, to be honest — even now I’m trying to restrain myself.

From the Craigslist listing:

Rare Vintage GE Replica Little Miss Structo Child’s Kitchen Set

The sweet little vintage child’s kitchen set is very rare. It was manufactured by GE. It is made of metal. The drawers and cabinet doors open and close and are fully functional. It is 3 separate sections. The middle cabinet has two Lazy Susan circular shelves the still turn. The upper section of the cabinets also have shelves. Some have plastic sliding doors, some are worn and some are missing. This child’s Kitchen Set is a made of metal and each piece is Approx. 12″-20″ in width and 12″-18″ in height.

Yes this mini kitchen needs a little restoration work — not unlike its full sized vintage counterparts often do — but with a fresh coat of paint and some new plastic sliding doors, this play kitchen could be restored to its former glory in no time.

Mega thanks to Craigslist seller Julee for allowing us to share her photo.

The post Simply adorable — vintage miniature steel kitchen cabinets made by GE appeared first on Retro Renovation.

Is there beautiful terrazzo flooring under all the carpet in Mike & Lindsey’s “House of Good Taste”?

$
0
0

Report #2 on their new Retro Renovation journey

uncovering-original-floorHOGT-graphicMike and Lindsey were so eager to see whether there was beautiful original terrazzo flooring under the miles of wall-to-wall carpet in their “new” 1964 Edward Durell Stone “House of Good Taste” that after they closed, they made an immediate bee-line to pull up the carpet. Much to their delight, they uncovered a whole lot of terrazzo flooring in excellent structural condition — although there were also a few strange surprised hiding under all that cream carpet.

mid-century-terrazzo-flooringMike writes:

We knew prior to buying the home that the original terrazzo floors were hiding under the carpet. The owner admitted never seeing them, as the same carpet had been down for the entire 25 years they owned the home.  Unable to get confirmation of their condition, and only able to get a small peak by pulling back a corner of the carpet, we hoped, prayed, and kept our fingers crossed that they were in good shape. We knew that refinishing structurally sound terrazzo would not be a huge deal, but repairing significantly damaged terrazzo is a big expensive undertaking. We literally headed straight to the house after closing to pull the carpet up and find out what were were dealing with…

mid-century-living-roomEach section of carpet we pulled back produced a huge sigh of relief as we unveiled some of the coolest terrazzo we had ever seen. A bright white base with black, grey, and green flecks. Although it was extremely dirty, yellowed, and covered in carpet pad glue, it was in excellent condition. There were carpet tack strips nailed directly into the terrazzo all around the perimeter, but from research we knew those holes could be dealt with. What confused us were all of the square paint lines on the floor… it took us a minute to figure out what they were… but we realized that someone must have taken all the doors from the kitchen cabinets, laid them out on the floor, and proceeded to paint them directly on the terrazzo!!! I can just image what was gong through their head, “who cares, nobody will ever want to see these ugly floors anyway”

original-terrazzo-flooringWith the terrazzo exposed to the light of day after 25 years, The House of Good Taste renovation begins!

remodeling-work-in-progressOur overall goals for this renovation include giving the house a timeless feel, so that regardless of whether it is 50 years ago, present day, or 50 years from now, things just “feel” right.

The following is our general renovation outline, which we are sure will evolve as we get into the details. We are blessed to have our master carpenters from L&D Construction also acting as our general contractor. The house was last updated in the late 80′s, and we look forward to peeling back the interior layers while keeping its great bones intact. We hope you enjoy this journey with us. We welcome all comments, suggestions, and criticisms along the way :)

Kitchen
Complete redo, but with same basic layout.

Walls and ceilings
Scrape popcorn and every inch floated out completely smooth. [Precautionary Pam reminds: Be sure to work with a properly licensed professional to determine whether there is any vintage nastiness such as lead or asbestos in the surfaces and layers of your house before remodeling!]

removing-old-flooringFloors
Restore the terrazzo and new flooring in all the non-terrazzo areas.

Doors and trim
Replace all doors and trim throughout.

Electrical
New ambient and accent lighting throughout. Outside of the huge skylight, the lighting does little for a house that has so much to show.

Laundry
Complete redo.

Bathrooms
Not touching them at this point, they good enough as is to live with for now. Gotta leave some projects for the coming years right?

Exterior and landscape
Exterior does not really need much besides some paint touch up, and thinking about landscaping at this point would make our heads explode.

But first things first… DEMO!!!

demo-work-remodeling

Congratulations, Mike and Lindsey on the awesome terrazzo!

Ack! I cannot understand the logic behind painting doors inside the house on perfectly fine terrazzo flooring without drop cloths. I sure hope Mike and Lindsey — with the help of their properly licensed professionals — can clean up their beautiful terrazzo floors and make them look as good as new. Mike and Lindsey — It sounds like you have your hands full with that long list of projects – I for one am super excited to see how your home progresses over the next several weeks. Thanks again for sending another installment of the “House of Good Taste” chronicles and keep up the good work and updates.

Mike and Lindsey will be submitting stories about their “House of Good Taste” restoration as it progresses:

The post Is there beautiful terrazzo flooring under all the carpet in Mike & Lindsey’s “House of Good Taste”? appeared first on Retro Renovation.

Vintage New Old Stock vinyl by the yard — yummy retro colors, patterns and embossing

$
0
0

Hey: The company’s been adding more patterns since we first posted this story! Look again!

vintage-vinyl-patterns-retroWhen I researched sources for midcentury furniture leg ferrules, I discovered IFSCO Industries, Inc. — a real deal ‘retro’ company that has been in business since 1946. Turns out, the company’s roots are in “cushioning products” – and it is sitting on a large a stockpile of vintage vinyl patterns from the 1950s, 60s, 70s and 80s — perfect to recover vintage dinette chairs… make a banquette… or possibly use for patio furniture. The the company also has lots of New Old Stock vinyl wall wallcoverings. 

palace-vintage-vinyl

1960s Palace vinyl

IFSCO Industries, Inc. will celebrate its 70th anniversary in just two years. It was founded in 1946 by now the father and uncle of Tim Casper, who is now president of the company, which was originally known as Illinois Fibre Specialty Co, Inc. — ergo IFSCO.

About IFSCO Industries from their website:

Chicago entrepreneurs Casimir Kasper and his brother John identified the need for quality, affordable cushioning products to supplement the limited offerings available to the furniture industry. Their collaborative efforts led to the formation of Illinois Fibre Specialty Co., Inc.

vintage-PAISLEY-vinyl-wine

1960s paisley vinyl in Wine

From this modest beginning, opportunities were identified in expanding their product offering by partnering with vinyl fabric manufacturers, now IFSCO Coated Fabrics, investing in the machinery to product plastic and metal parts and assemblies, IFSCO Furniture Parts Unlimited, fabricated foams, felts, chipboard and insulation products, Illinois Fibre Fabrication and Insulation Services.

vintage-paisley-vinyl-Royal

1960s paisley vinyl in Royal

Having been in business since 1946, the Company has accumulated a vast library of dies, molds and patterns to product the most modern to the very retro-styles furniture parts as well as contemporary to traditional vinyl fabric patterns.

vintage-paisley-vinyl-purple

1960s paisley vinyl in Purple

vintage-PAISLEY-vinyl-pewter

1960s paisley vinyl in Pewter

vintage-PAISLEY-vinyl-honey

1960s paisley vinyl in Honey

Every employee in our manufacturing and distribution process is an important part of creating IFSCO’s reputation for exceptional value….

vintage-vinyl-basketweave-pattern

Craftweave Vinyl in Spruce Green

As of this publish date, there are just a handful of vintage vinyl patterns available on the IFSCO Industries website. But talking with company president Tim Kasper, I learned there is more yet stashed in the warehouse waiting to be assessed, photographed and listed online for sale.

vintage-70s-vinyl-pattern

Antique Gold Del Rio Vinyl

According to Tim, the company is an active national distributor of both domestic and imported vinyl today. But because of its long history, it also has a large stockpile of vintage vinyl colors and patterns from the 1950s, 60s, 70s and 80s — some is leftover stock, some is vinyl that the company received to settle debts from other companies that were going out of business. Tim says there are many colors and patterns, including flowered, woodgrain and “unusual stuff” that is all discontinued New Old Stock.

morning-star-vintage-vinyl

1960s Morningstar vinyl

Included in the company’s stockpile is a selection of vintage vinyl that is specified for use as a wall covering — mostly for kitchen backslashes, or wall coverings that were often used in RVs and Airstream vintage trailers. He said this ‘wall’ vinyl is not rigid, and is much thinner than what would be used to cover chairs because it doesn’t have to stand up to the friction and constant abuse from people sitting on it. This type of vinyl would typically be adhered to a wall board-like substrate and can be likened to a heavy duty vinyl wallpaper of sorts.

season-flowers-vintage-vinyl

1960s Season Flower vinyl

If readers are looking to replace the vinyl on a vintage dinette set that they have acquired, Tim says it is possible for IFSCO Industries to try and match the material with some of their NOS vinyl. He advises anyone wanting to try to find a match for their vintage dinette set to turn over one of their chairs and take a small snipping off the bottom of the seat to send to the company. Since the vinyl under the seat has not been subjected to years of dirt, grime, fading from the sun and abuse, it should most closely reflect the fabric’s original coloring. Once IFSCO receives this swatch, they can check to see if they have anything in stock that would be a match in color or pattern.

IFSCO Industries has worked with indiviuals looking for specialized vinyl in the past, including a man who specialized in restoring vintage Studebakers from the 1950s. In addition to finding vintage vinyl for this customer, the company had some of their new vinyl dyed and regrained to very closely match the original seat coverings from the Studebakers.

Pentagon-Vinyl-colorscolors-of-vinyl-for-vintage-dinettesIf you can’t find the right color in the company’s retro vinyl archives, Tim suggests checking out the Premiere and Pentagon styles, which offer a rainbow of colors to choose from.

IFSCO Industries, Inc. does most of their business with large scale orders, which explains why some products have a minimum order amount, but both their vintage vinyl and new vinyl can be purchased by the yard.

Mega thanks to IFSCO Industries, Inc. company president Tim Kasper for answering my many questions for this story.

Nom nom nom. All these vintage patterns sound scrumdilicious!

More dinette info from our archives:

The post Vintage New Old Stock vinyl by the yard — yummy retro colors, patterns and embossing appeared first on Retro Renovation.

Where to find table leg glides for vintage kitchen dinettes — including NOS

$
0
0

IFSCO-Chair-glides-ad-vintageWe already know that IFSCO Industries, Inc. is one of the few places you can find midcentury furniture leg ferrules and vintage vinyl to repair your retro dinette sets, but the company also makes many varieties chair glides. Company president Tim Kasper tells me they have been manufacturing glides for vintage dinette chairs, tables and other furniture in house since 1946. He also let me in on a little secret — the company has a stash of NOS chair glides that they produced in house over the last 20-40 years. If you have a vintage dinette set that is missing some chair feet, try contacting IFSCO Industries, Inc. to see if they have a match.

retro-chair-glides vintage-dinette-set-chair-glides

You can also look in IFSCO’s online catalog of furniture parts to get an idea of the parts and sizes available.

The post Where to find table leg glides for vintage kitchen dinettes — including NOS appeared first on Retro Renovation.


More Karndean 12″x12″ vinyl tile floors with retro and retro-modern style

$
0
0

retro floor tileI’m not saying I love all the colors — most are too darn greige for me — but if you are looking for retro style vinyl floor tiles, remember to take a look at the Karndean. Above: The faux pebble design in these tiles kinda sorta remind me of 1970s floor tiles.

MX98-Web MX97-Web MX95-Web MX93-WebMX92-UmbrianNero-Bathroom-P_CMAbove:  These mosaic designs from Karndean are still one of my favorites.

Retro-blue-kitchen-floorI’ve featured these before, and we’ve had at least  one reader — that’s Jessica’s floor, above — use them in her house. If I were doing a three-seasons screen porch, for example, I would not hesitate to use these. These come as close as I have seen yet to our beloved Armstrong #5352 flooring in terms of look and feel. I wish we could get Karndean do to do this in brick color. That would be fabulous!

I was tidying up in the basement this past weekend, and came across the samples that Karndean sent me. It inspired me to go online to see if they had any new designs, and it seems yes, so hence today’s story.

MS2-Web MS2-NavarraChalk_OH_CM MS1-WebMS1-GalacianQuartz_OH_CMMS1-Galacian-Quartz-Comm-SQ2_CMAbove: More of that pebbly tile. This also has the look of concrete aggregate… maybe consider if you’re into retro-modern…

MLC01-WebMLC01-Tungsten_EstateAgents MLC07-Comet-Kitchen-LS MLC08-Atomic_OH_CM MLC08-Atomic-Bathroom-PAbove: And then there are these… retro-modern, for sure, rather than anything you would have likely seen back in the day. Still, interesting — and NOT faux granite and stone, which today seem to make up the bulk of the mainstream market. These vinyl tiles are also resilient: Much softer under foot than tile or concrete, long lasting (as far as I know) and should clean and shine up nice.

Now if the industry could just get beyond the broken record of depressing low-chroma greige undertones already. Please let it end soon. Please.

The post More Karndean 12″x12″ vinyl tile floors with retro and retro-modern style appeared first on Retro Renovation.

Mike and Lindsey restore and refinish their terrazzo flooring — with gorgeous results!

$
0
0

“I am sure we are biased,
but it is the best looking terrazzo we have ever seen” — Mike

floor refinishersHOGT-graphicFrom the day they closed on their ‘House of Good Taste‘, Mike and Lindsey dreamed of restoring the home’s original terrazzo flooring. For a job of this magnitude, the couple called in the professionals — and now after much hard work — they share the process that brought their terrazzo back to gorgeous life.

paint-on-terrazzo-floorBefore being carpeted — a job that left the floor covered with divots from tack strips and carpet glue — the terrazzo also had been used as a paint ‘drop cloth’, making it desperately in need of refinishing and repair.

Mike writes:

Demo: Check!
Electrical: Check!
Walls and ceilings: Check!
Secondary floors: Check!

Now onto what we have been waiting months for: To bring the original terrazzo floors back to life.

carpet-glue-on-terrazzo-floor

Carpet glue on terrazzo floor.

This is something we have anxiously waited for since the day we bought the house and rushed straight over pull the carpet back. We did a lot of research, reading, and talking about how to tackle the job. Initially we could not find a company that specialized in terrazzo that we felt comfortable with and was reasonably priced. At one point we had decided to just do a hard core DIY clean job and then later look at getting them professionally refinished.

But once we dealt with Greg at Pro Surface Solutions on the polished concrete we got a better understanding of what it takes to do these jobs right and felt we could trust them with the terrazzo as well. We also liked that one company would be handling the floors in the entire house. We knew the terrazzo was structurally sound, but it was just so yellowed and covered in carpet glue that we were not completely sold that it could ever look like new again.

The process to bring them back to life that Greg laid out for us is as below. We are going with a final finish more on the matte side instead of high gloss. We will bring both the concrete and terrazzo to about a 800 grit and see how that looks.

Sanding the terrazzo floors

terrazzo-floor-before-refinish

  1. Diamond grind begin at 100 grit
  2. Diamond grind at 200 grit
  3. Lithium densifier applied
  4. Diamond grind at 400 grit
  5. Diamond grind at 800 grit
  6. Apply two coats Ecoguard Primer and two coats Ecoguard sealer
  7. Burnish (polishing with heat) at 800 grit with poly pad

[Precautionary Pam reminds: Remember, readers, that vintage nastiness may be found in the layers of old houses. Be sure to consult with a properly licensed professional to determine what you are working with so that you can make informed decisions about how to handle any potential environmental and safety issues.]

diamond-grinding-terrazzo-floor

Diamond grinding terrazzo floor.

Our fears of being able to bring the terrazzo back to life were put to rest after just the first couple of diamond grind passes, they looked absolutely amazing. The bright white base with the different shades of green are just stunning, I am sure we are biased, but it is the best looking terrazzo we have ever seen. Going to see the progress on them each day is about the closest thing an adult can get to being a kid on Christmas day.

carpet-tack-damage-on-terrazzo-floor

Carpet tack divots.

Handling the nail holes in the terrazzo floor

We do also have the issue of the divots left behind by the carpet tacks around the entire perimeter. We were given two choices in dealing with those. 1) They could fill them in with a white epoxy that matches (as best they can) the base color of the terrazzo and then they would paint on speckles to mimic the aggregate. This would not cost anything extra and would just be part of the overall refinishing job, but it won’t look perfect. 2) We could have a outside company make us an exact match to our terrazzo and then fill in those divots with new material. This option was presented to us as between $500-$1,000 to just get the match done and then extra for the install.

carpet-tack-fill-on-terrazzo-floor

Carpet tack divots patched using stock white filler.

We went with the 1st option, and no, it is not perfect, but we are ok with it, and in the grand scheme of things you really don’t notice at all.

sealer-applied-to-terrazzo-floor

Terrazzo flooring with sealer applied.

The only disappointment in the whole process was that as soon as they were finished they had to be completely covered for the next stages of construction. We literally won’t see them again until the very end, when everything else is done. Just like with the polished concrete, they will come back and do a final polish pass right before we move in.

refinished-vintage-terrazzo-floor

Refinished terrazzo floor prior to final polish.

refinished-terrazzo-flooring

Refinished terrazzo floor prior to final polish.

In some ways it feels like things are flying by so fast, and in other ways it feels like we are moving at a snail’s pace. We are roughly half way done in terms of time line and are already about 4 weeks behind. Looks like we will have to ask the buyers of our current house to push back the closing date by a month.

concrete-terrazzo-together

Refinished terrazzo next to polished concrete flooring.

Next up is the build out by the carpenters…. and oh boy do we have a few things planned :)

WOW — those refinished terrazzo floors are spectacular. Mike and Lindsey, we are so glad that the refinishing process was so successful, as we know you will enjoy these floors for many, many years to come. The newly refinished terrazzo looks great with the polished concrete. We can hardly wait to see how the whole house comes together. Mega thanks for sharing this whole process so far with all of us retrophiles.

Read the previous stories in Mike and Lindsey’s series on the renovation of their Edward Durell Stone House of Good Taste:

The post Mike and Lindsey restore and refinish their terrazzo flooring — with gorgeous results! appeared first on Retro Renovation.

Fingerblock parquet flooring — an authentic choice for wood floors in a midcentury house

$
0
0

wood-parquetParquet floors, especially in oak, were a top-of-the line choice for midcentury homes — and now, we’ve learned the official name for this pattern — fingerblock flooring. We also found a place to buy it — including four-finger, 9″ x 9″ squares in red oak — exactly like the original parquet in Pam’s 1951 dining room, above.

fingerblock-parquet-floor

Photo via Czar Floors

The source we found:  Czar Floors – which offers fingerblock parquet in a variety of sizes, wood species and number of fingers per module.

Reader Jennifer, who left a comment on our post about parquet flooring in midcentury homes, prompted Pam’s search.

Jennifer wrote:

We just had a burst pipe flood and ruined our 1957 original oak parquet that was in the entire house except the baths and kitchen. Our three bedrooms were spared. Sad, sad, sad. I asked a local master hardwood expert / floor restorer about it and he said that the only way to get these 3/4 inch red oak parquet tiles is to have them custom made or salvage them. (They only make a lower quality 5/16 thin, premade parquet these days). They actually have to custom make them from pre-cut strip flooring boards because no one manufactures them anymore. Bummer. And it is super duper expensive (possibly 3 to 4 times the cost of a strip floor)

As for us, we are looking for a new engineered floor (per his recommendation) because we live in hot, humid, wet Florida and hardwood buckles even with the humidity sometimes here. We are trying to find something (strip flooring, most likely) that will look good with the red oak parquet in the bedrooms that was spared the water damage. We have to replace the hallway wood that opens to the bedrooms.

What have others done to keep the floors looking period appropriate when they couldn’t get lovely old parquet?

fingerblock-parquet-flooringBut wait, Jennifer — we live to hunt — and quickly found this flooring for you at Czar Floors.

Yes, this fingerblock parquet flooring is not cheap at $9.95 per square foot unfinished, but it is made from 3/4″ thick wood planks, solid all the way through — just like the old-school real-deal midcentury stuff — so it should last a lifetime — heck, multiple lifetimes! Both the individual “fingers” and each square tile fit together with tongue and groove, and the folks at Czar Floors recommend also using an adhesive to install their fingerblock parquet flooring.

vintage-style-fingerblock-parquet-floor

Photo via Czar Floors

A snipped from the Czar Floors website, which provides lots more detail there:

Also called “Fingerblock” this pattern can be found in many “brownstones” [Editor's note: And midcentury houses, we would add!] It can be replicated in variety of sizes, number of planks and wood species….

1956 bedroom sherwin williams

1956 bedroom with fingerblock flooring  from a Sherwin Williams Paint brochure that reader Callie sent to Pam — thanks, Callie!

The verdict –we love fingerblock parquet flooring. In particular, we love that it’s “multi-directional.” That means it runs in both directions, equally. We learned this word from laminate expert Grace Jeffers — the most versatile abstract laminate designs are multi-directional. We also love learning this new term “fingerblock.” Reminds us of our recent journey learning the term Pickwick Pine.

If you have the dough re mi — what a fantastic floor to be able to add to your house. Or, if you have one already — golly, you know what to call it and have further sense of its worth.

Link love:

For more parquet floors:

The post Fingerblock parquet flooring — an authentic choice for wood floors in a midcentury house appeared first on Retro Renovation.

Earthy and colorful 1970s style wall and floor tile — pretty affordable, at Home Depot

$
0
0

Merola-60s-and-70s-tileWe’ve written about Merola Tile’s great ceramic and porcelain tile offerings for vintage and midcentury bathrooms in the past. Today, more exciting news — Merola Tile has branched out into styles, colors and glaze effects that reflect the groove-tastic late 60s and 1970s. Flower power, vivid square mosaics, arabesque and several other fantastic patterns have joined the lineup. As always, these affordable tiles are available through Home Depot’s website — making it easy for anyone to get their retro bathroom or kitchen groove on.

Photo courtesy of Shoot2Sell Photography.

Photo courtesy of Shoot2Sell Photography.

Ever since I saw the gorgeous aqua blue mosaic tile bathroom from the 1967 time capsule house that A. Brandt Ranch Oak built in Forth Worth, Texas, I’ve been thinking it might be nice to add a late 60/70s style tiled bathroom to my home’s unfinished basement — where I am also planning to build a Tiki bar someday. The vivid color and irregular glaze in these tiles really appeal to me, and I think that some of Pam’s love for the 70s has started to rub off on me. That’s why I was super excited to see that the same company that made the University Pink mosaic floor tile that I used in my retro pink bathroom and the light green Metro Hex tile that I’m contemplating using to replace the floor in my vintage mint green bathroom has begun making tiles that speak to this era of decor — in vibrant colors, too!

I contacted Maggie McBride, Communications Specialist for Merola Tile to find out the story behind some of their newest designs.

Maggie writes:

We chose many of these products because we want to be the purveyor of the interesting and unique. When it comes to what’s standard right now, our products are simultaneously eccentric and timeless. We’re a fun company — it’s only fitting that our product lines reflect that, reaching out to others who are interested in making their home as unique as they are. Your choices showcase some intrigue from a range of different time periods and countries, and our selection keeps getting more eclectic and funky!

I also noticed that blue is one of the common colors among the items you listed. We choose a lot of blue because people (including us!) tend to gravitate towards it– it’s soothing, natural, and versatile, accommodating a number of settings and needs. A few of the tiles are standalone pieces that don’t coordinate with another specific series (this is true of the Bouquet Perennial, Modena Cobalt Blue, and Earthen Elements).

Without further ado, here are the back stories to these particular product selections:

Merola-Tile-BouquetPerennial

The Bouquet Perennial evokes an emotional response. It’s totally unique; no one else has it or anything like it, so we’re happy to carry it for that person looking for the perfect retro floral finish in their home.

Merola tile Moderna

John, the president of the company, makes sure we always carry Moderna Cobalt Blue because when he first entered the tile business 30 years ago, it was going out of style, but he absolutely adores the design and associates it with his humble beginnings — and now it’s back in. It’s meant for a swimming pool (forming the 6” border), so it’s durable and impervious.

merola tile palaceMerola-Tile-MoonbeamPacificBlue

The Palace tile has the same origin story, actually — and from its evident popularity, we introduced the Moonbeam series which has a similar feel.

Merola-Tile-BaroqueCopper

The Baroque Square tiles (comes in pewter, brass, and copper) are 16 individual 1” tiles that we sell in packs with the intent to help every customer beautify their home exactly to their taste. They’re very versatile — you can use them to accent square tiles (cut the corners of the larger tiles and insert these), line them up to form a border, or arrange them any way you like.

Merola tile Resort Palm green

The Resort series is a collection of traditional pool tiles that comes in a variety of blues, greens, and even black for added drama. They have kind of a marbleized glaze and you really get the full visual impact when it’s underwater — it gets what’s been described as an “extra wet” effect.

Merola-Tile-OceaniaSquare2Bering Merola-Tile-OceaniaSquare2Marine

The inspiration for adding the Oceania tiles to our program is that it reminded us of 8”x10” pieces sold in the USA back in the early 1980s called Watersplash tiles.  I’m having trouble locating photos, but John advised that World of Tile may have some.

Merola Tile Earthen Elements

Earthen Elements has a 70s appeal — like, 970 AD. (That is not my joke. I wish I could take credit for that.) It’s totally different from anything else we have, which is part of its charm. Another piece on our quest to carry the exotic luxury-grade pieces at an affordable price.

Merola-Tile-EssenceSage Merola-Tile-EssenceScarletMerola-Tile-Essence4InchSand

The entire Essence series is a colorful tribute to 70s decor. The 4×4 inch square tiles are available in few bold colors but also a selection of more subdued, timeless creams and beiges.  The Sea Blue is especially appealing because a truly retro blue can be difficult to find, but this shows the depth and range of bold colors from the time. I didn’t include photos of the Essence Sapphire because we’re working on getting an updated product shot for it.

Merola-Tile-LanternMiniCobalt-tile Merola-Tile-ProvenzaleLanternBlue Merola-Tile-ProvenzaleLanternCotta

The Lanterns are also amazing, as is their range of colors.

Merola-tile-Arabesque-tile-blue Merola-tile-arabesque-tile-green

We also carry a closely-related Arabesque series, which is Moroccan-inspired as well.

Mega thanks to Maggie from Merola Tile for providing us with product shots and information about the company’s fantastic array of late 60s-70s style tiles.

Tips to view slide show: Click on first image… it will enlarge and you can also read my captions… move forward or back via arrows along the photo… you can start or stop at any image:


The post Earthy and colorful 1970s style wall and floor tile — pretty affordable, at Home Depot appeared first on Retro Renovation.

Mike and Lindsey gut remodel the kitchen in their 1965 midcentury modern house

$
0
0

L&D-ConstructionHOGT-graphicIn this sixth edition of the series, Mike and Lindsey have called on the help of their friends at L&D Construction — the same guys that custom built the midcentury modern master bathroom vanity in their first home — to help them gut remodel the kitchen, including making custom walnut kitchen cabinets. Drawing inspiration from fellow Retro Renovators and a photo of an original Edward Durell Stone House of Good Taste kitchen, Mike and Lindsey are well on their way to creating the midcentury modern kitchen of their dreams.

kitchen-before

Mike & Lindsey’s House of Good Taste kitchen before.

kitchen-before-retro

Mike & Lindsey’s House of Good Taste kitchen before.

Mike writes:

So here we are, roughly 2/3 of the way through renovations and although we have accomplished a ton so far, we are desperately ready to start seeing the kind of progress that makes it feel like a home. Our beautiful newly refinished floors are completely covered and we are ready to start the kitchen build out.

At this point we are bringing in the heavy hitters, our master carpenters from L&D construction, Joe and Kenny. We have worked with Joe and Kenny on several projects and wouldn’t trust anyone else with this job. Retro Renovation readers should be familiar with Joe’s handy work as he is the one who built the custom vanity for our pink master bath renovation.

We have several inspirations that we are pulling together in order to achieve the specific look and feel we want in our new kitchen. One of our inspirations is actually from a Retro Renovation story that ran long before the House of Good Taste was even a twinkle in our eye, Rebecca and Keith’s Mad Men kitchen remodel. When we saw their amazing walnut cabinets we made a mental bookmark in the hopes that someday we could incorporate something similar in our own kitchen remodel. Our second source of inspiration comes from a photo of the original House of Good Taste kitchen that ran in the September 1964 issue of Better Homes and Gardens Magazine (which we were able to find our own original copy of).

white-dimensional-tiles

Here (above) is sample board of the basic finishes we have selected.

  1. Full overlay slab walnut cabinets stained natural.
  2. Caesarstone quartz countertops in “Blizzard”
  3. Dal Tile 3×9 oval from the Natural Hues collection for the backsplash, to be laid in a stacked format. A far more budget friendly option than the similar style from Heath Ceramics we first came across

Kitchen-cabinet-frames

The walnut cabinets will be the star of the show in the kitchen. We feel that having them against a back drop of the polished concrete floors, white ceilings and walls, and white counter tops and backsplash, will make them a show stopper. But don’t worry, we will have some pops of color mixed in there with Lindsey’s Cathrineholm collection.

building-kitchen-cabinets

We are not making any radical changes to the layout of the modest sized 13×13 kitchen, but simply spacing things out a little bit to be more ergonomic and visually appealing.

  • The double wall ovens will be replaced by a single oven built into the lower cabinetry under a induction cook top. This will free up space for a larger pantry and fridge.
  • The pantry will house the microwave to keep it out of sight, which goes along with our decision to not have any wall outlets cut into the backsplash, but instead the outlets are housed under the upper cabinets to keep a clean seamless look along the backsplash.
  • We will not reinstall a door in the entryway to the kitchen. There was originally one there, but we feel not having one will make things feel more open and not be interfere with the pantry doors

grain-matched-walnut-drawers

  • Lower cabinets will mostly be large drawer units.

new-patio-sliding-door

  • A new 8′ long sliding glass door will replace the current french doors that we assume replaced the original sliding door long ago.

kitchen-island-midcentury-modern

  • A very strategically sized and placed island will serve as our kitchen table and seat 4 people on three sides comfortably.  The fourth side (near the sink) will have pull out drawers for trash and recycling. Pulling off the island that could do all this as well as allow 40+ inches of walkway on all sides took a bit of configuring.

While the guys from L&D construction execute our kitchen plans we are busy working on some of details items:

EJS-wall-sconce-midcentury

We scored 4 matching vintage perforated cylinder wall sconces by EJS, the company that is famous for their 1959 Stockholm series, which is now commonly reproduced. Sadly these were given a faux “wood grain” paint finish by their previous owner, but with a little bit of elbow grease and gold paint, they should be a stunning addition to the entryway hall.

vintage-door-chime

We were also inspired by a recent Retro Renovation post about doorbell chimes and decided to reach out to Robert at ElectraChime for more information. We were trilled to discover he also is a collector/seller of original vintage chimes and was able to sell us just the perfect chime. Unfortunately we could not fit a long tube chime, but went with the short tube type commonly referred to as a resonator. We got a Rittenhouse model 8271 in near perfect condition.

cabinet-staining-midcentury-cabinets

We have several other significant projects getting under way in the rest of the house, which should make our next installment the best yet!

Mike and Lindsey — so far your kitchen is looking great! Thank you so very much, Mile, for continuing to chronicle and share your Retro Renovation journey.

Readers, we know you want to see the finished rooms — sorry for tantalizing you! Mike & Lindsey tell us the renovation is in its last phase — the big reveal of all their finished spaces should be coming soon!

Read all of Mike and Lindsey’s stories about their Edward Durell Stone House of Good Taste

The post Mike and Lindsey gut remodel the kitchen in their 1965 midcentury modern house appeared first on Retro Renovation.

Viewing all 371 articles
Browse latest View live